guess-the-number
GUESS-THE-NUMBER!
Guess-The-Number is a Python based application fully run within the terminal.
This app runs 3 core programs:
- Guess-The-Number: The Player has to guess a randomly generated number.
- Guess-The-Number (AI): Same as above, except this time, the computer has to try to guess the player’s number!
- Coin-Toss: A bonus program that simulates ‘flipping a coin’ with the computer.
This application explores the posibilites of automation with Python, handling user inputs and random outcomes through the use of classes and functions.
The desired goals from the perspective of myself and for the player reflects this. I want to demonstrate what can be done with Python through the aim of creating 3 programs that can simulate random game events that the user is likely to have played in real life, whether attempting to guess a number that their friend was thinking of to flipping a coin to decide on who goes first in a game.
Guess-The-Number is deployed on Heroku.
Live Link to the app on Heroku here: Guess-The-Number
Application across difference platforms
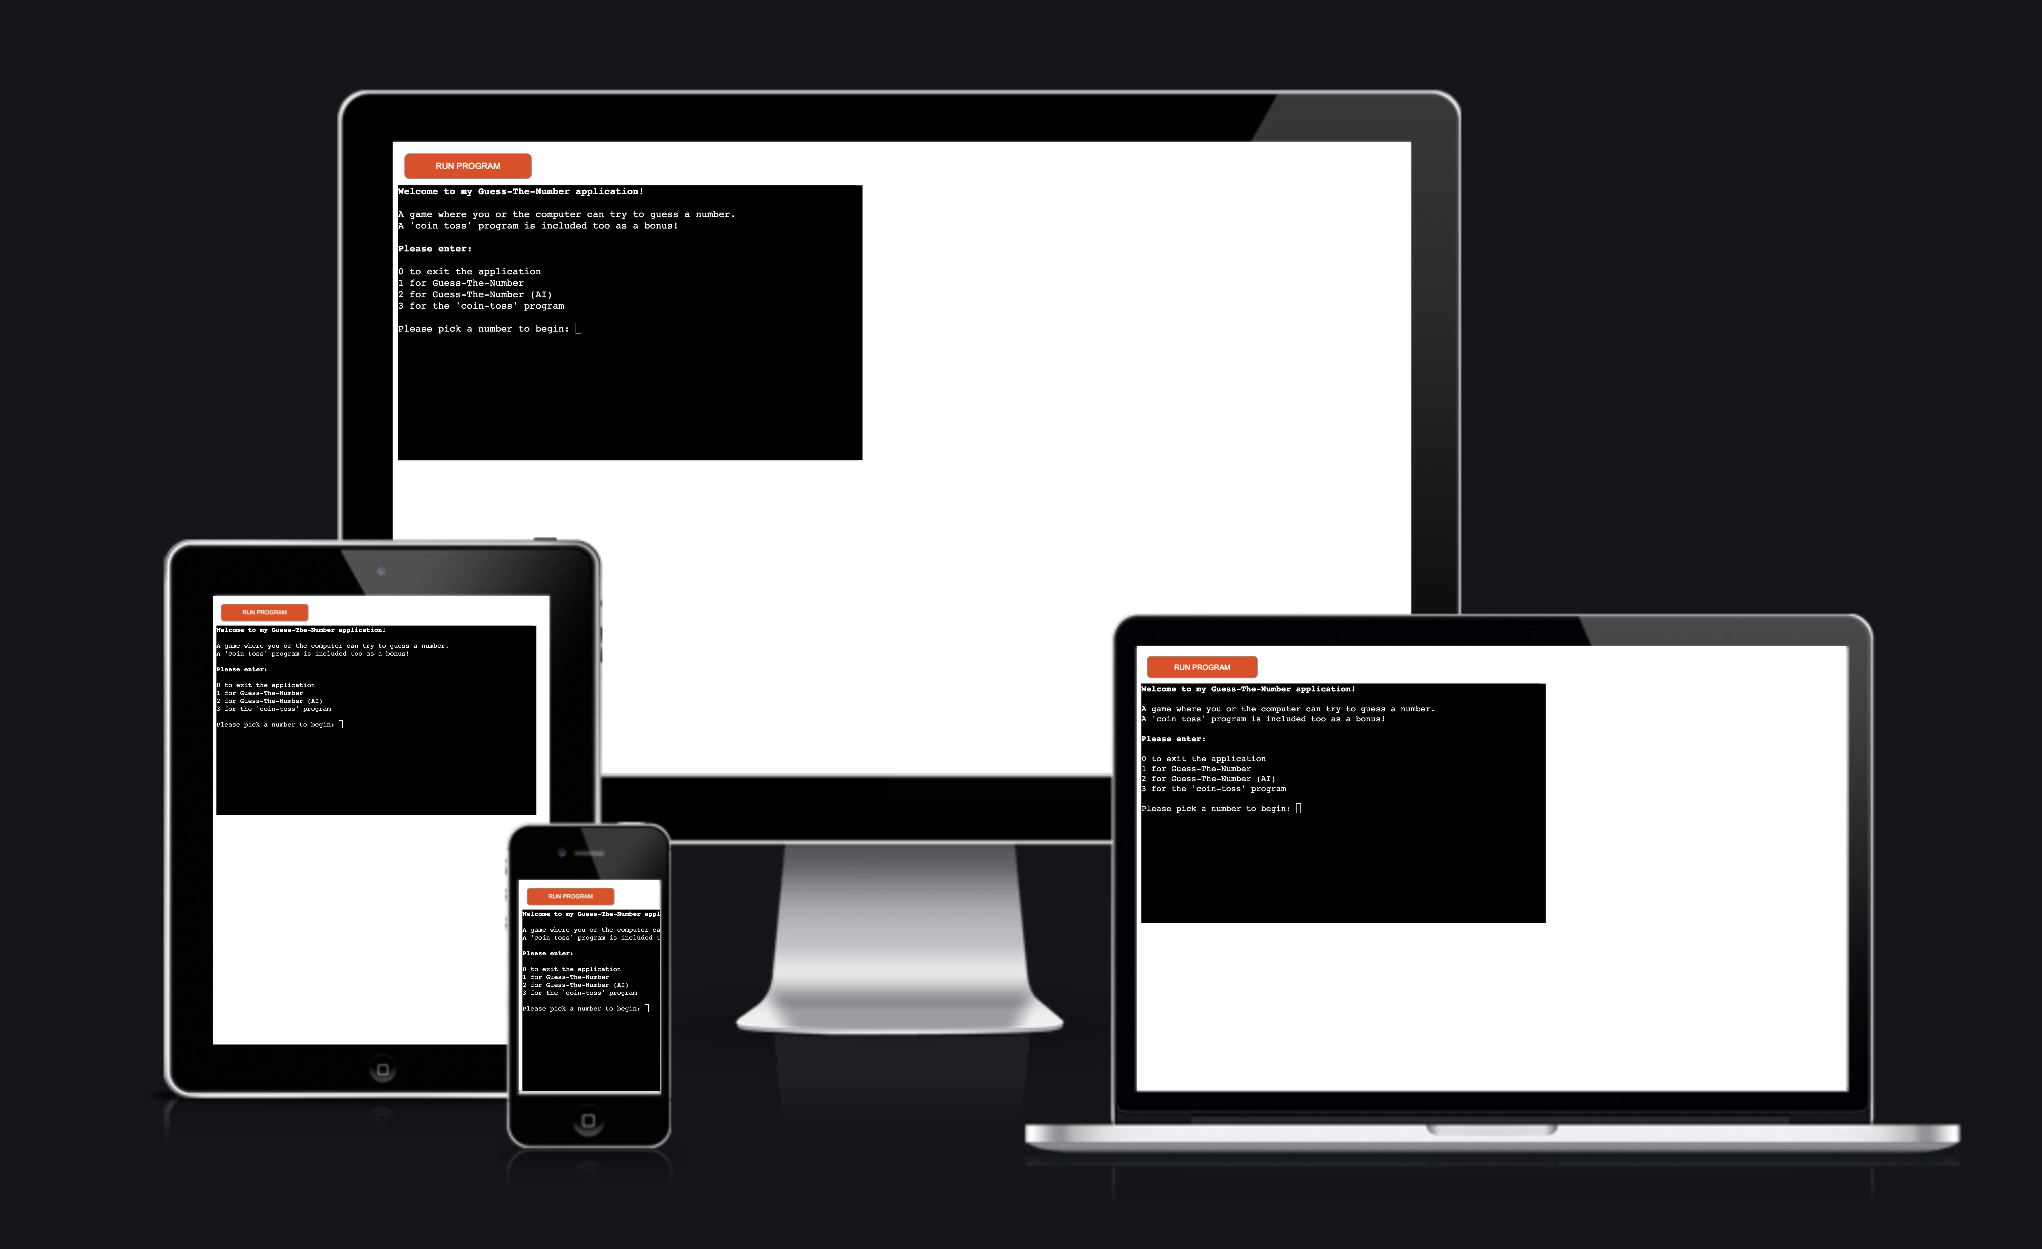
Note: The application is run in a ‘mini terminal’ in the browser through Heroku. Therefore, projecting the terminal to showcase the python logic at work is more important that ensuring the width of the ‘screen’ is aesthetically pleasing across all devices.
Application in action

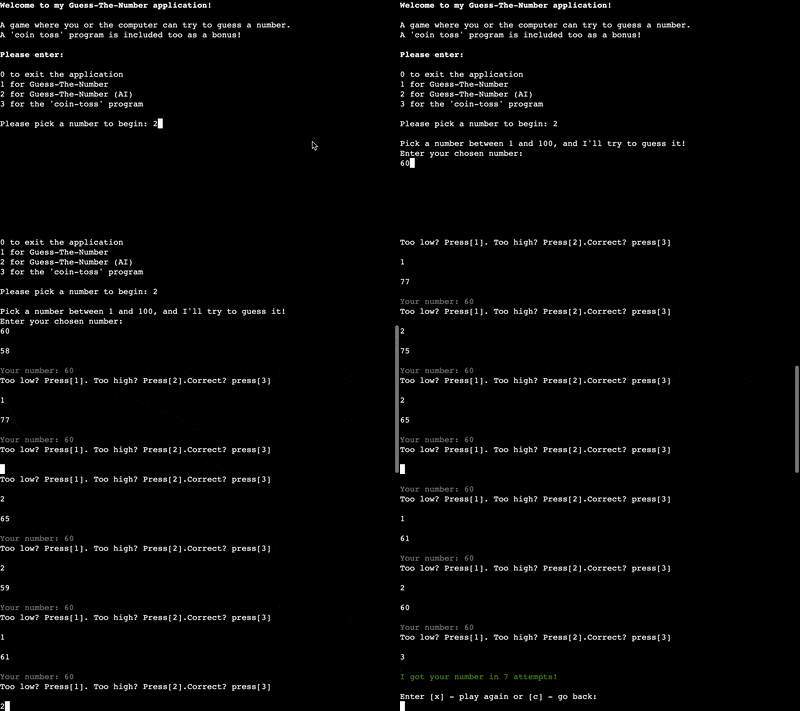
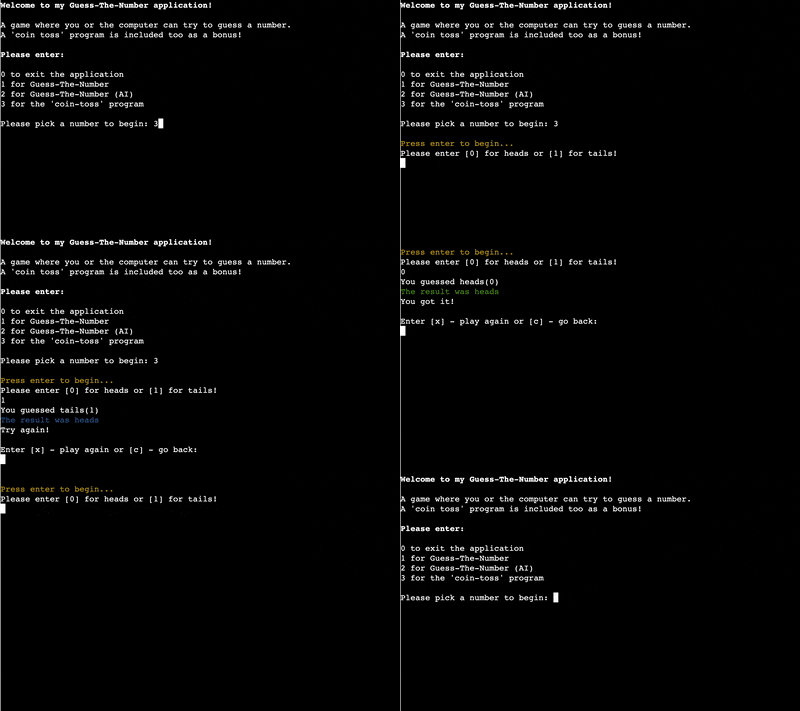
Table of Contents
- Wireframe and Flow charts
- UX Description
- Technologies used
- Application Features
- Features to implement
- Testing and Validation
- Bugs and Issues
- Peer Reviews
- Deployment
- Credits
Wireframe
- I used Blasamiq to make a flow chart to map out the logic of how I wanted the program to run.
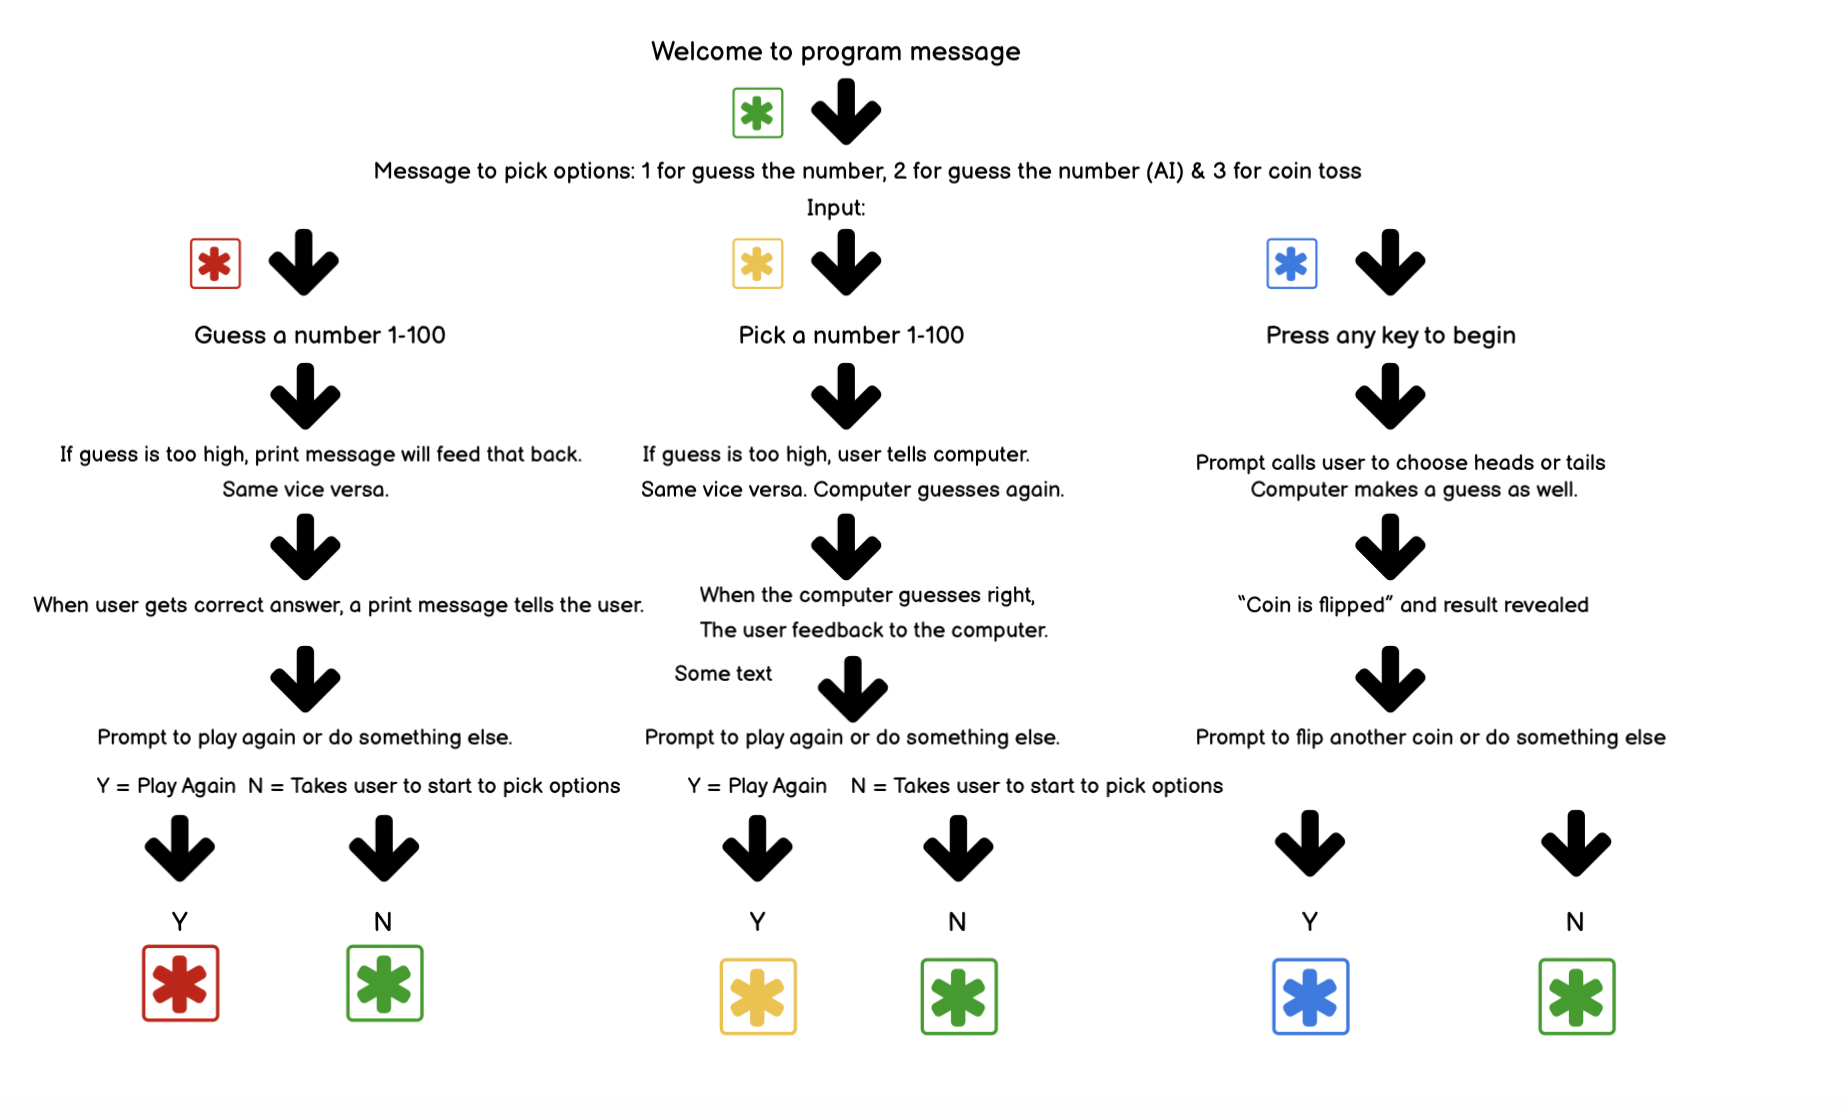
I used this model as a template for me to visualise how I was going to go about making this application. You can see in the original flow chart I didn’t come up with the option to exit the program yet. The coloured asterisks are meant to help visually guide where you are taken back to at the end of round depending on whether you want to play again or exit the game.
Program flow charts:
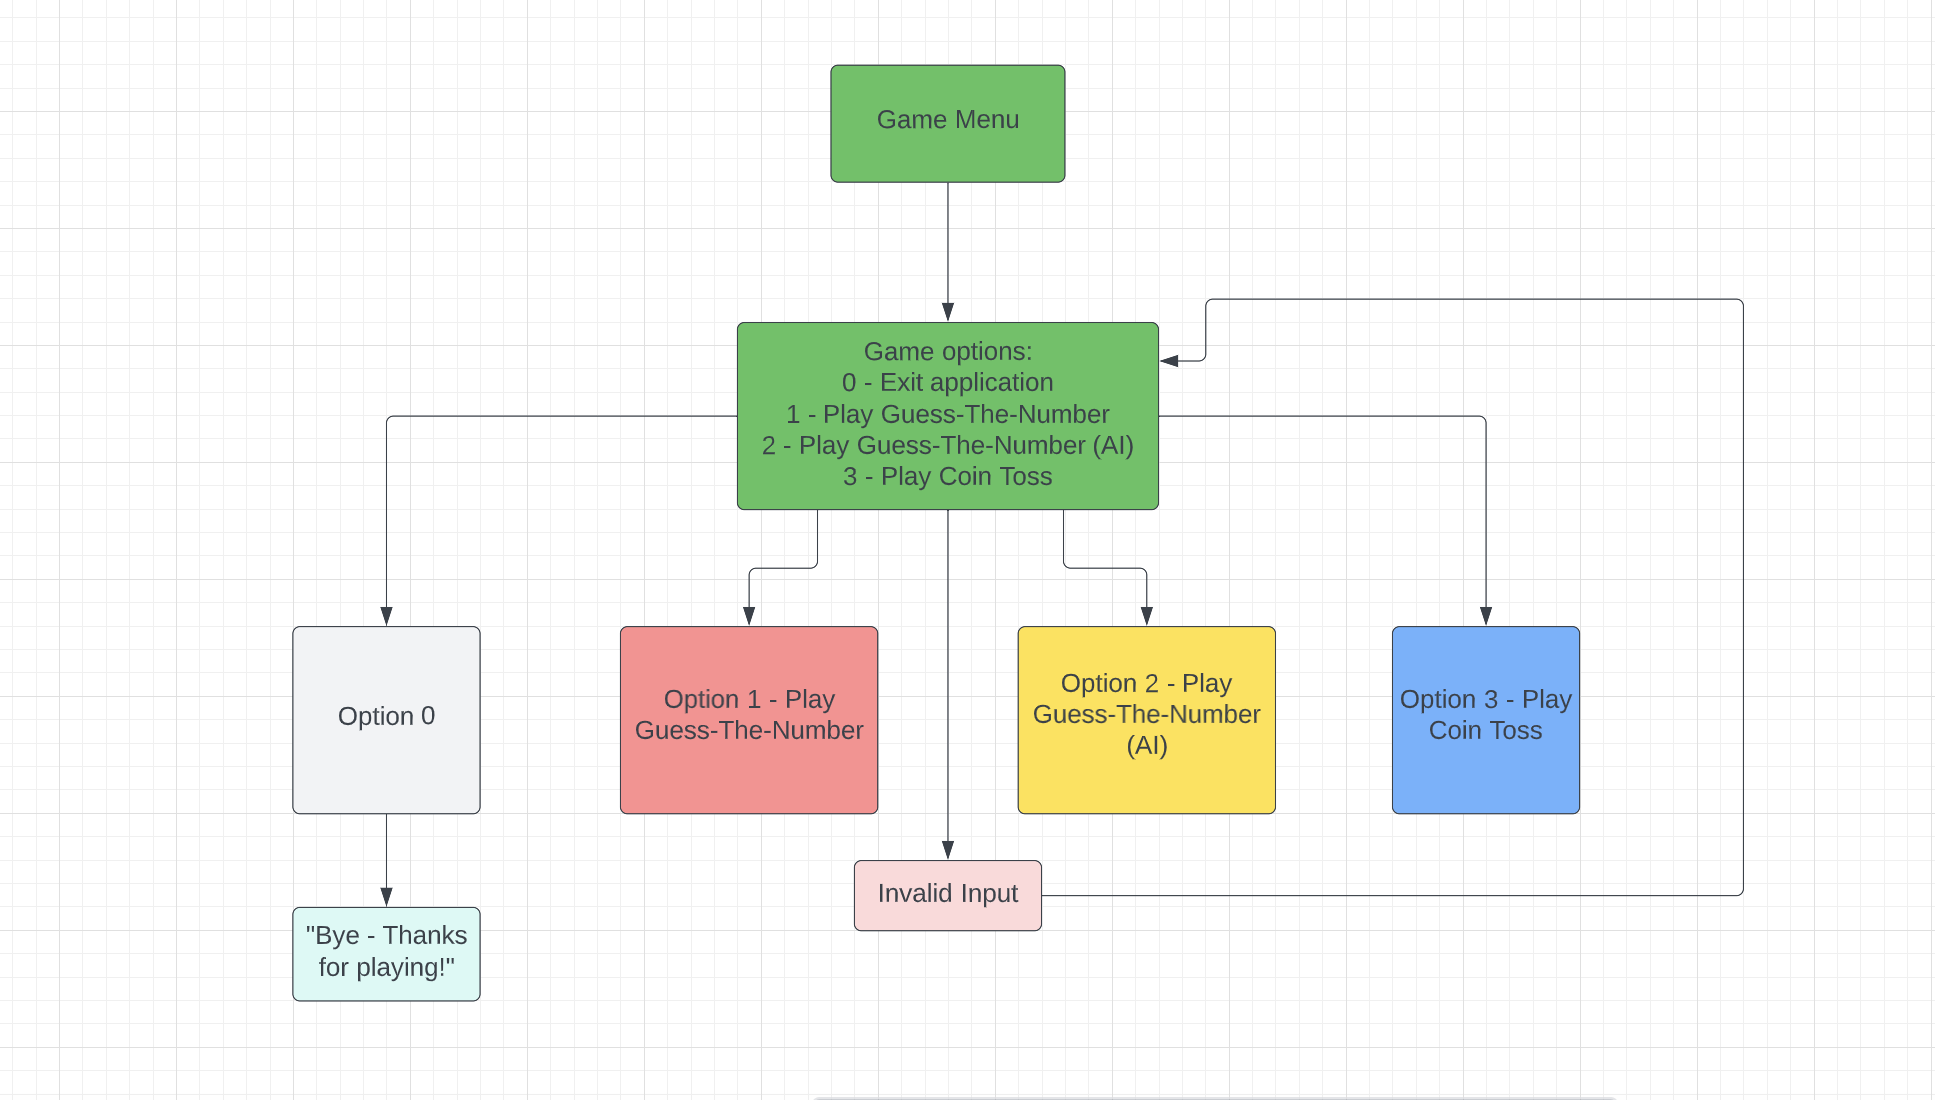
- A flow chart displaying the Main Menu
Main Menu Flow chart
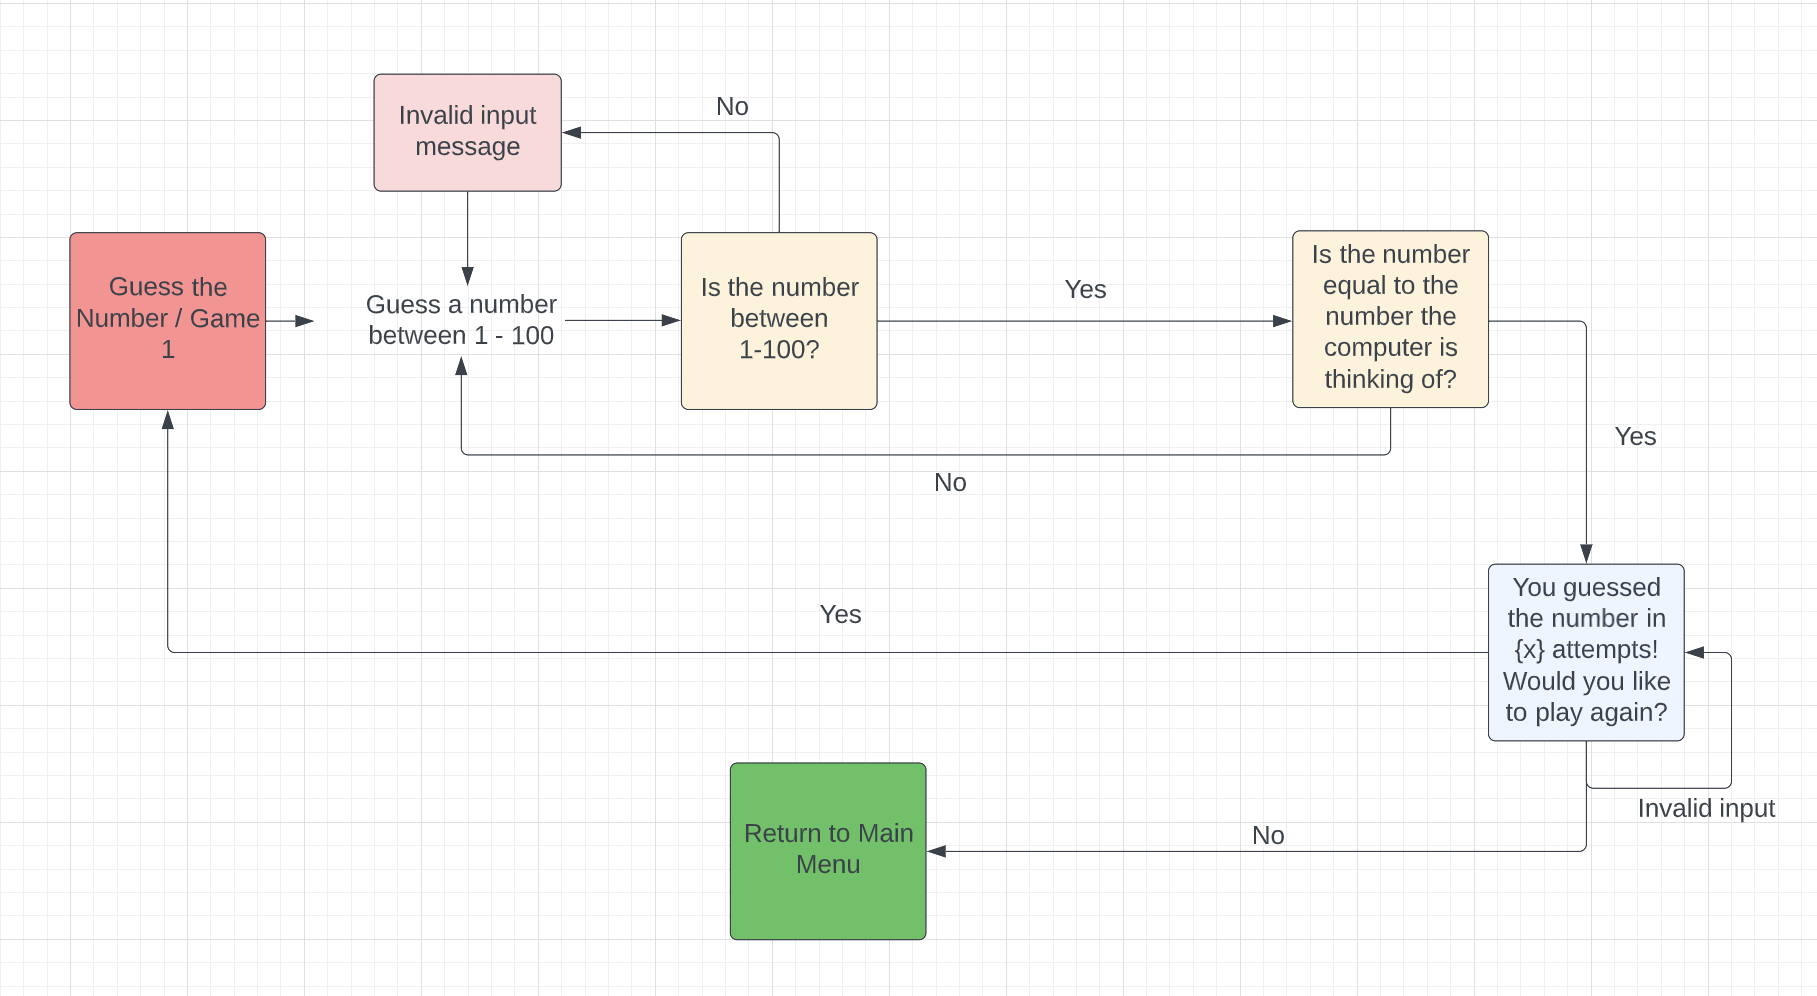
- Game 1: Guess-The-Number
1st Game Flow chart
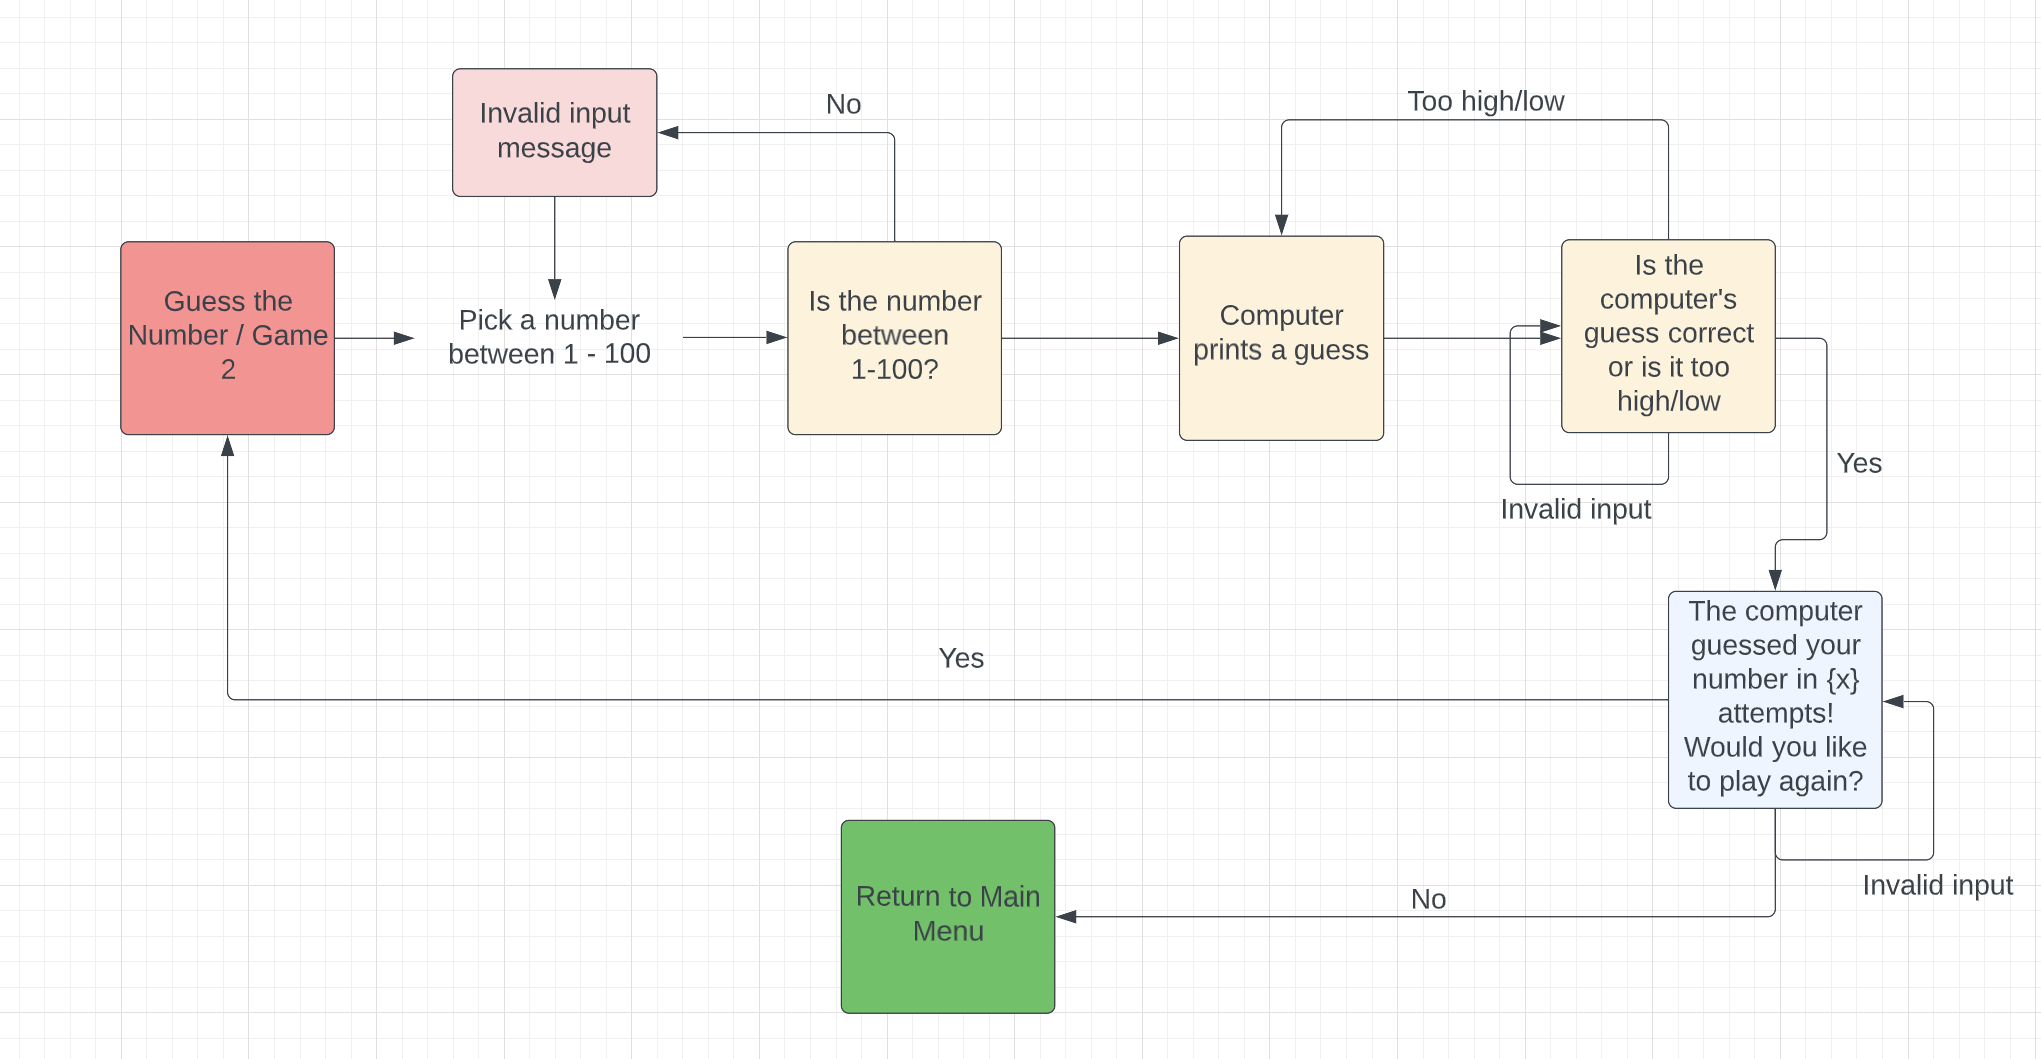
- Game 2: Guess-The-Number (AI)
2nd Game Flow chart
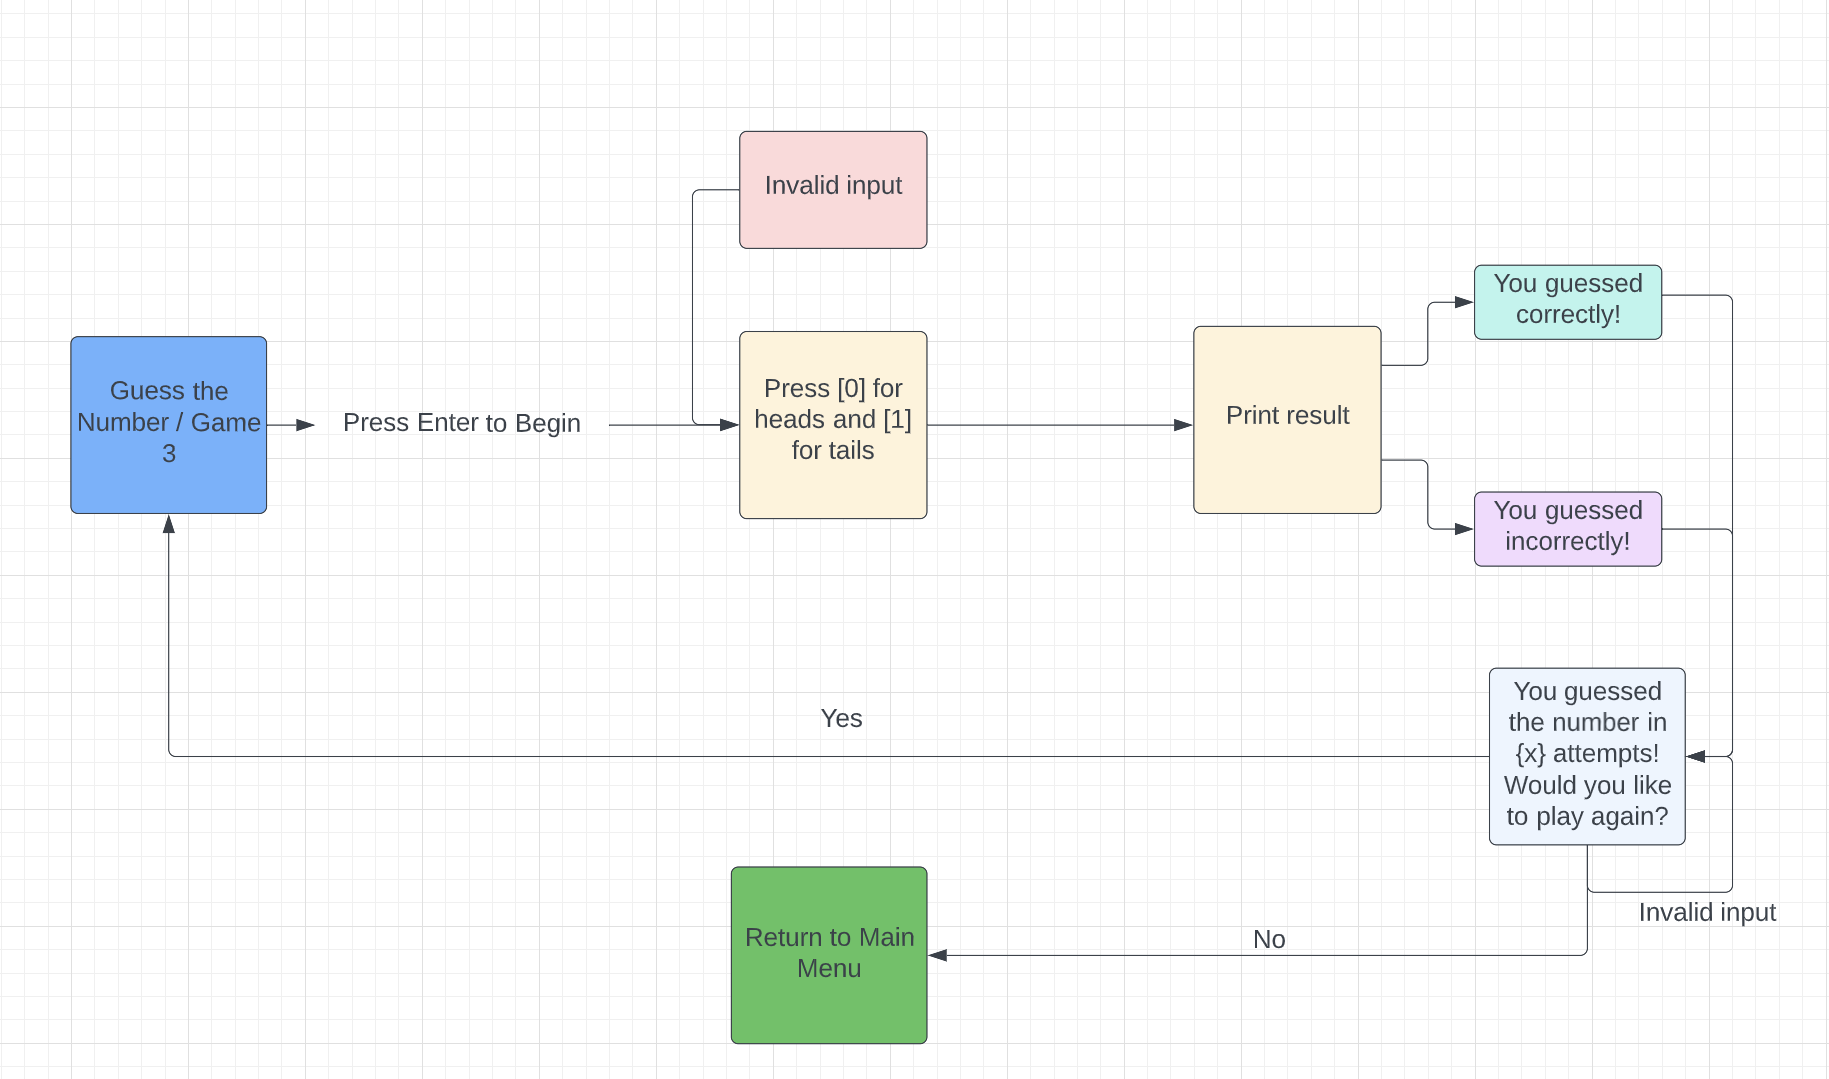
- Game 3: Coin Toss
3rd Game Flow chart
UX Description
How to play the game:
Guess-The-Number is an input based application, where depending on assigned input options, the player can make guesses or make selections on what game they’d like to play.
In the first game, Guess-The-Number, the player must try to guess a number between 1-100, which the computer has “thought off”. The player can enter a number one at a time, and they will get feedback from the terminal on whether their guess was higher or lower than the computer’s number. When they guess correctly, they will be told along with the number of attempts it took to guess it.
A prompt then encourages the player to either play again, or, go back to the main menu.
In the second game, Guess-The-Number (AI), the player now calls the number they’re thinking of between 1-100. The computer makes guesses and the player provides feedback on whether the guess is too low, high or spot on. This is done by entering 1 for too low, 2 for too high and 3 for a correct guess. The computer then prints how many attempts it took to guess the player’s number.
A prompt then encourages the player to either play again, or, go back to the main menu.
In the third and final game, Coin-Toss, the player hits enter to begin and is asked to call Heads or Tails by selecting 0 or 1 on their keyboard respectively.
The computer will “flip a coin” and the result of the coin toss is printed. Whilst this is predominantly a player vs computer coin toss, you could use this program to make a traditional coin toss decision as well!
As per the previous games, a prompt then encourages the player to either play again, or, go back to the main menu.
I’ve used colorama to provide more visual cues as user feedback when they engage with the application. Typically, the colour red will indicate an error, yellow will indicate a prompt to action or a warning and green indicates a round win or end of round message. I use cyan and magenta for some other prompts including too high or too low guesses in the second game and for the goodbye message if you exit the application.
User Stories
-
Target Audience: A user who will want to play a command-line interface game, who will take inspiration from this to make their own Python-based game or just casually try out a new type of simple game.
-
The user can expect the following:
- A completely intuitive game with easy to comprehend instructions/rules
- A completely command-line-interface based game
- No time limits. This game is to be enjoyed at the user’s own pace.
- Playable across all devices.
- Enjoy a random-number-based game
- Be able to exit the application at the end of a game.
Technologies and Libraries Used
- Python: A form of O.O.P (Object Oriented Programming) that is used for data handling. This has been the main tool used in my project.
- Github: The cloud based service for hosting repositories for over 73 million developers.
- Gitpod: An open-source developer platform for remote development.
- Git: Used to add, commit and push my changes to the server.
- Balsamiq: Used to plan and create my wireframes for my projects.
- Heroku: Heroku is a platform as a service (PaaS) that enables developers to build, run, and operate applications entirely in the cloud.
- LucidCharts for mapping out flow charts.
- Built-in Libraries used include os and random - used for dealing with random numbers and clearing the terminal.
- Other Libraries used include Colorama - used for adding colour and style to the terminal. I specifically imported Fore and Style from Colorama to change font colours and brighten/dim text.
- PEP8 Validator for checking that my Python code meets PEP8 standards.
- Google Collab for testing small pieces of code outside of Gitpod and still within a browser.
- Quickplayer on Mac to screen record.
Application Features
This application comprises of 3 core programs:
- A guessing game (Player)
- Another guessing game (Computer)
- A ‘Coin-Toss’ program
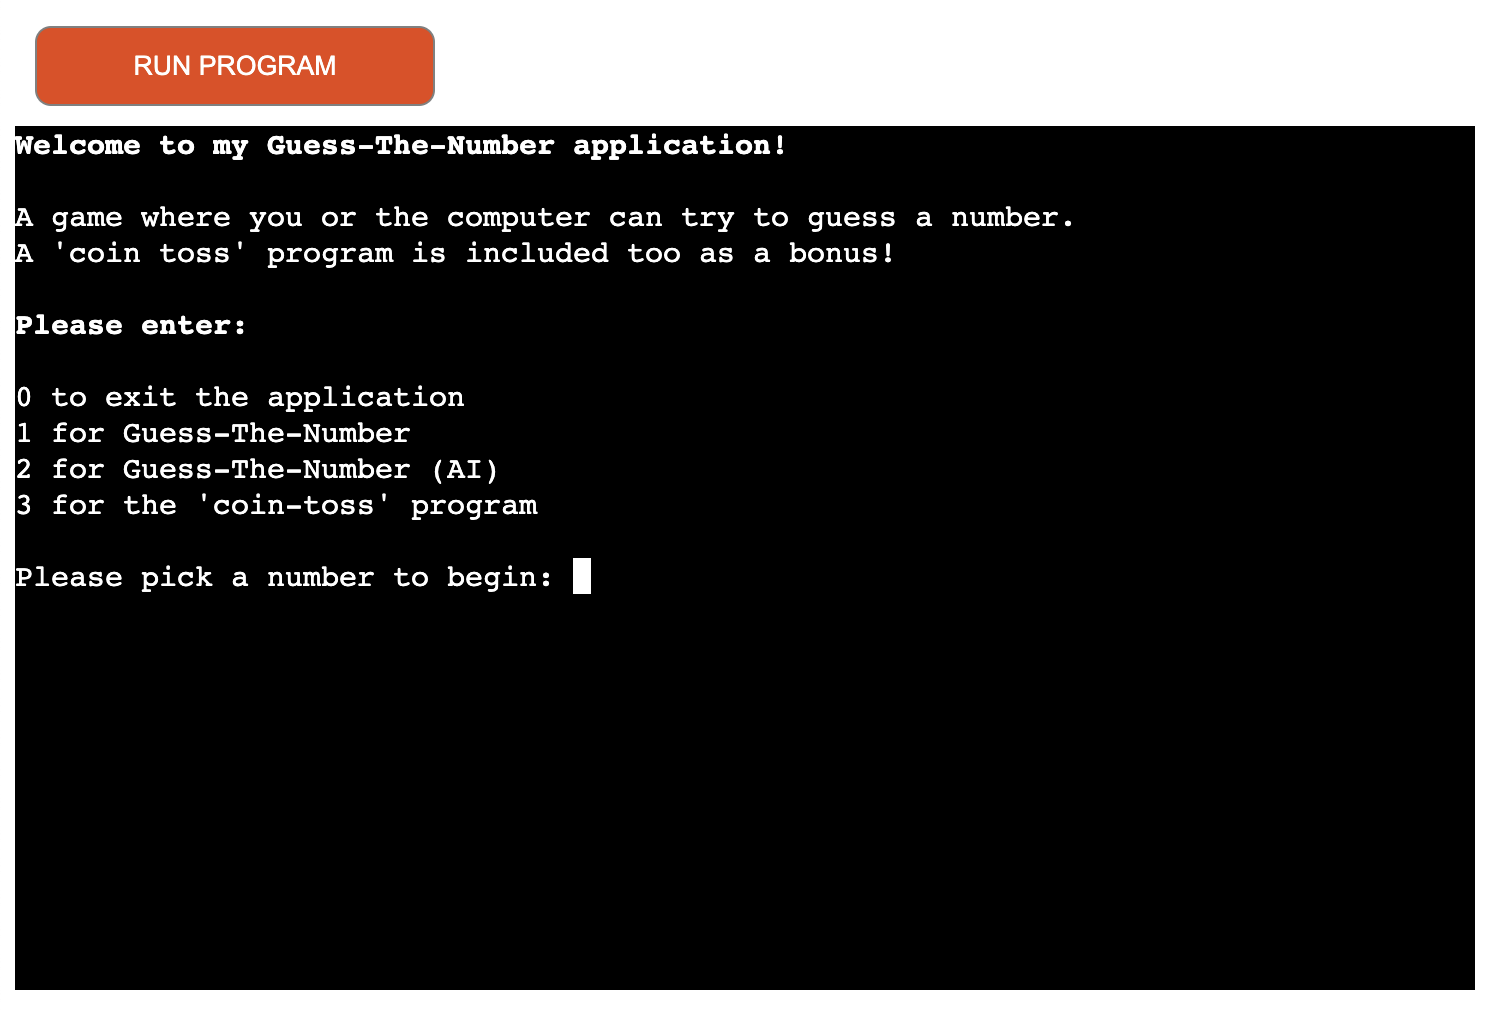
At the beginning of the application, there is a welcome message/main menu that also re-prints at the end of a game round should the player wish to go back to the main menu:
First Game Option: Guess-The-Number. The player will be greeted with the start of the game like this:
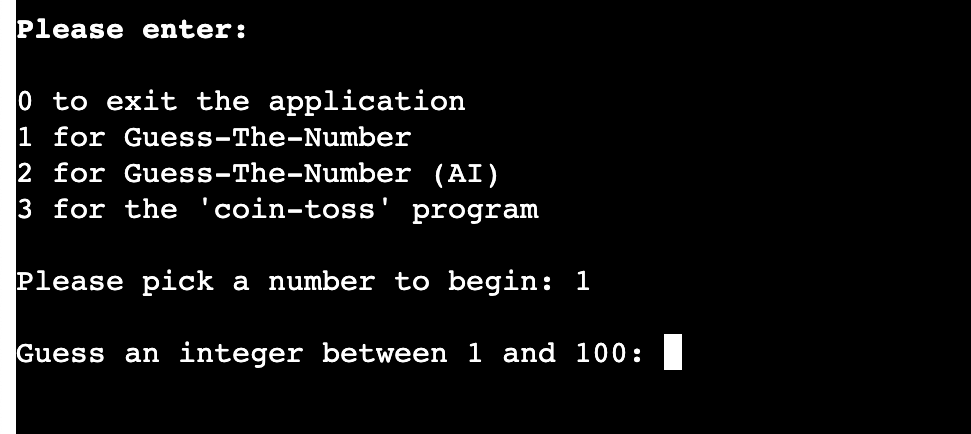
When a player makes a guess, which will most likely be incorrect on first guess, a response message is printed in the terminal which will influence the player’s next guess:


With each passing guess in the round, where the player doesn’t successfully guess the correct number, the previous guesses are printed in a list so that the player doesn’t forget/guess numbers that they have already guessed previously:

When the player guesses the number correctly, the following will print to the terminal:

If you press x, you will return to the start of game 1 (Guess-The-Number):

If you press c, you will return to the menu and you will have the ability to start a new game or exit the application:
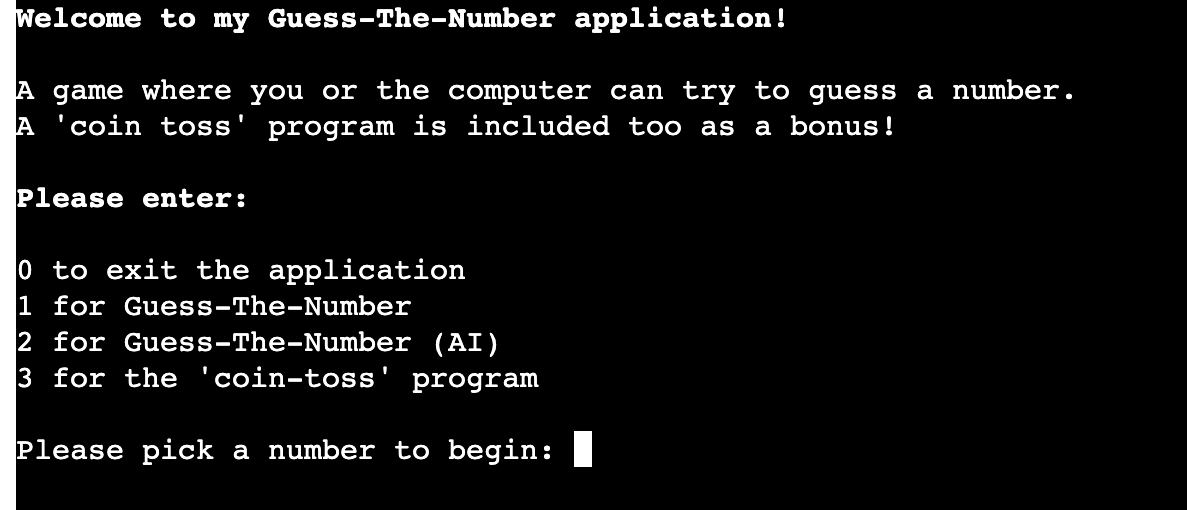
Second Game Option: Guess-The-Number (AI). The player will be greeted with the start of the game like this:
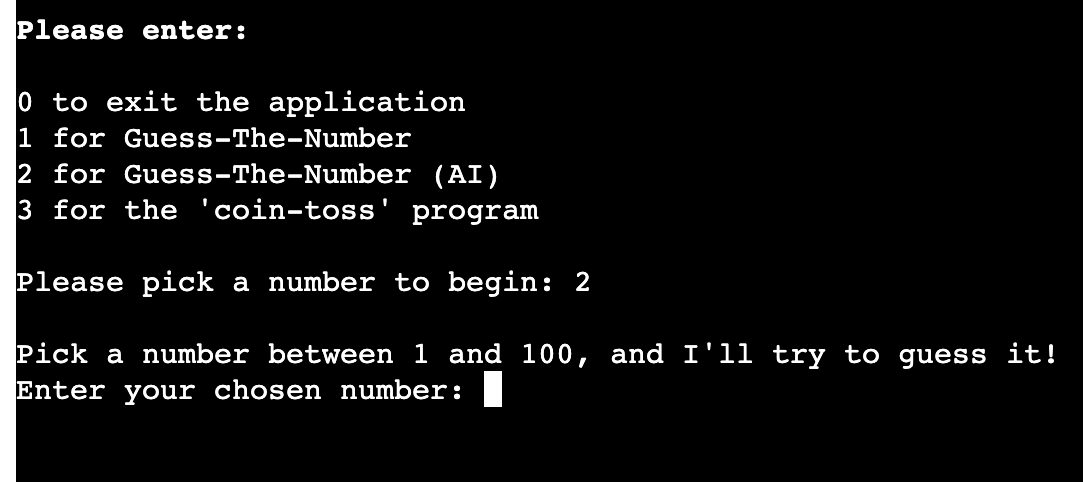
In this demo, I have decided to pick the number 75. As you can see below, the computer has made its first guess that is too low - the user would press 1 to indicate this to the computer:

Now, in the computer’s second attempt, the computer has made a guess that is too high. The user will now feedback to the computer that this is the case by entering the number 2 where directed:
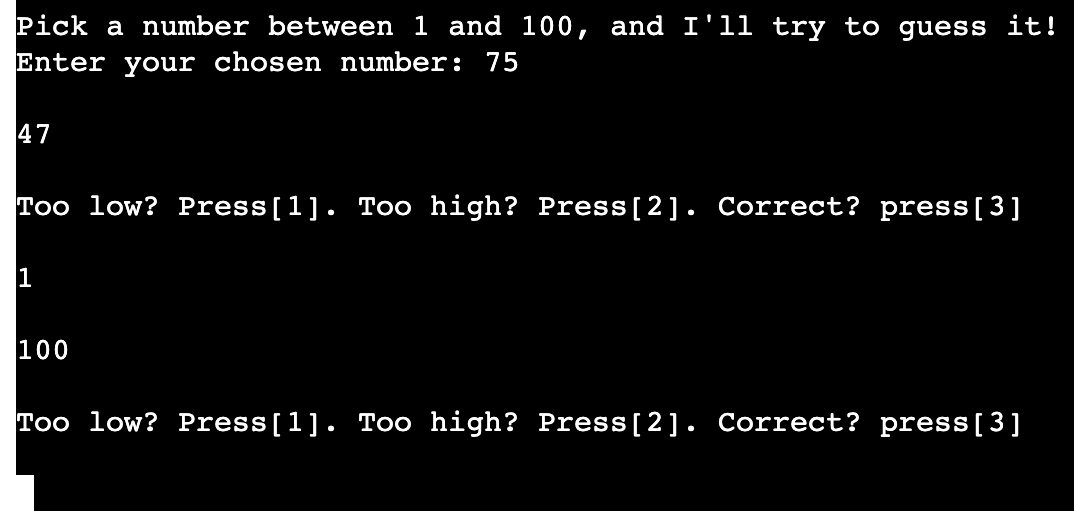
Eventually, assuming of course that the player informs the computer in good faith, the computer will guess the correct number, and when this happens, the player should press the number 3 to confirm that their number has been guesses. A statement is then printed to say how many attempts it took for the computer to guess the correct number:
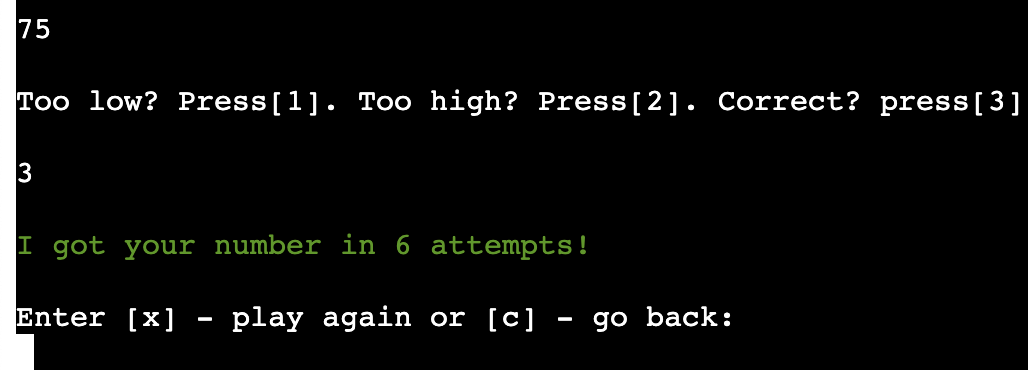
The player, as per the first game, is presented with the option to play again (press x) or go back to the menu and exit the current game (press c).
If they press x:

And if they press c:

Third Game Option: Coin Toss The player will see this message at the start of the program:
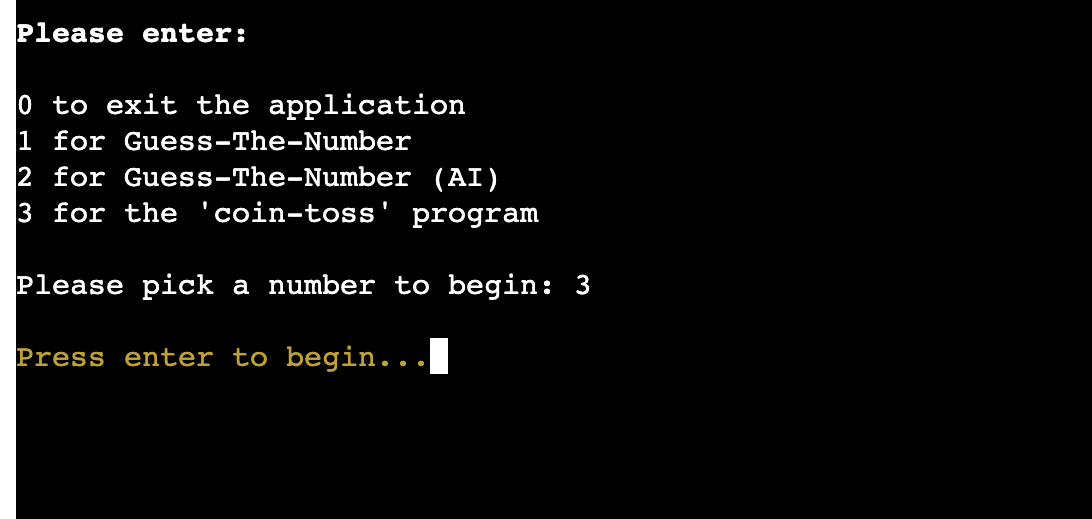
When the player presses Enter, there will be a prompt that asks the player to pick heads or tails by entering 0 or 1 respectively:

If the player enters 0 (Heads) - one of two options will print:
If they call heads and it lands on tails:

If they call heads and it lands on heads:

If the player enters 1(Tails) - one of two options will print:
If they call tails and it lands on heads:

If they call tails and it lands on tails:

At the end of the round, as per the previous games, the player is always presented with the option to play again or exit the current game and return to the menu.
If they press x:

And if they press c:

Error/Invalid input messages:
In this application, there are various different messages to inform the user that they have made a mistake and entered an invalid option.
In the main menu, you will see a message like this printed if you enter an invalid input:
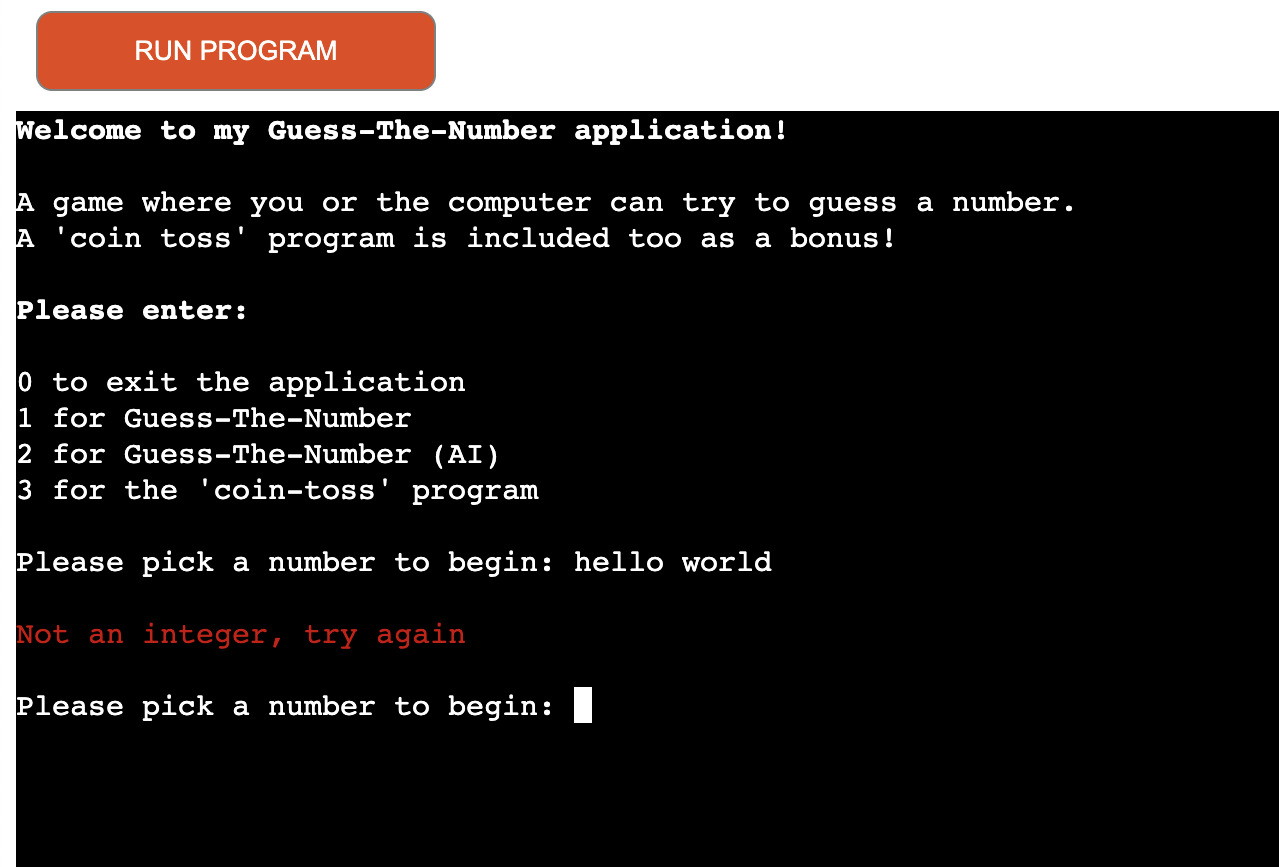
In game1 (Guess-The-Number), these are the errors you will find if you enter incorrect integers, strings or floating point numbers:


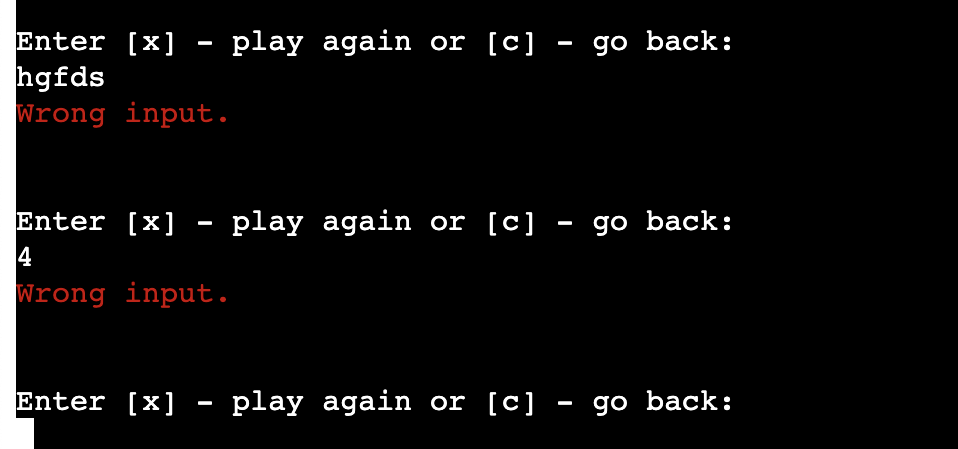
If you enter an invalid option at the end of a round to either play again or return to menu, such as entering a number, incorrect string or float, you’ll find an error message like this:
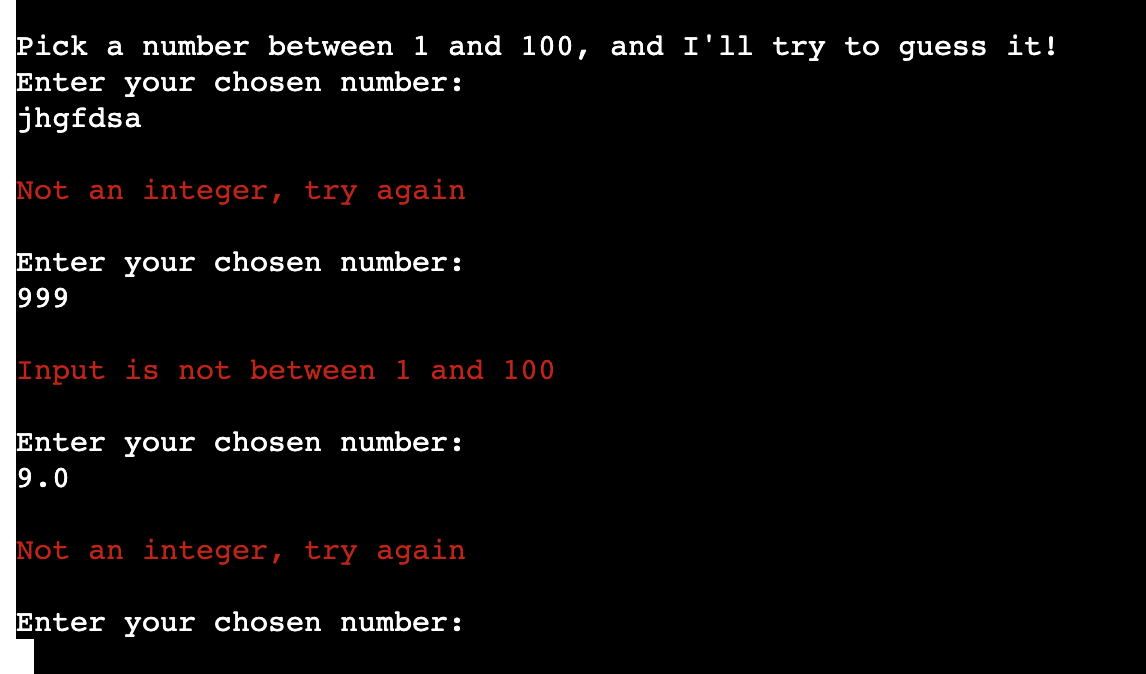
In game2 (Guess-The-Number (AI)), these are the errors you will expect by entering incorrect integers, strings or floating point numbers:
Similarly, if you don’t input correct feedback options, you’ll be presented with errors:

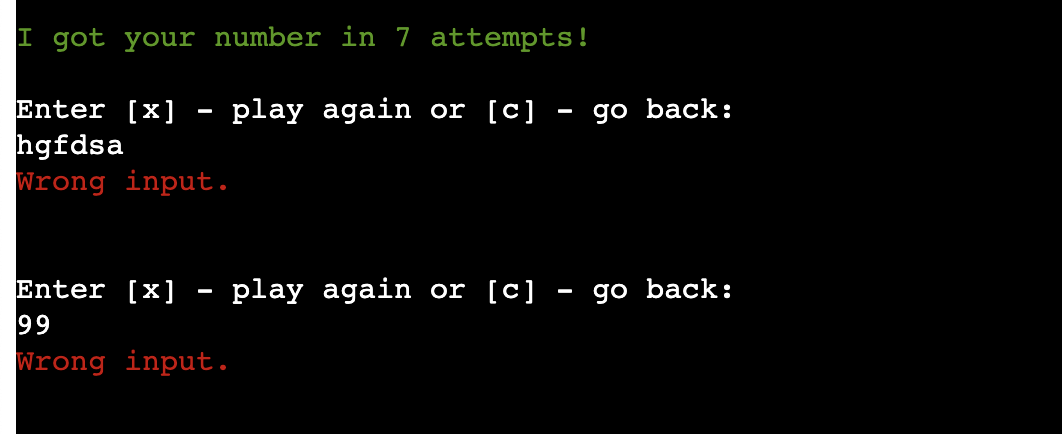
As above, if you enter incorrect inputs at the end of a round, errors will show as below:
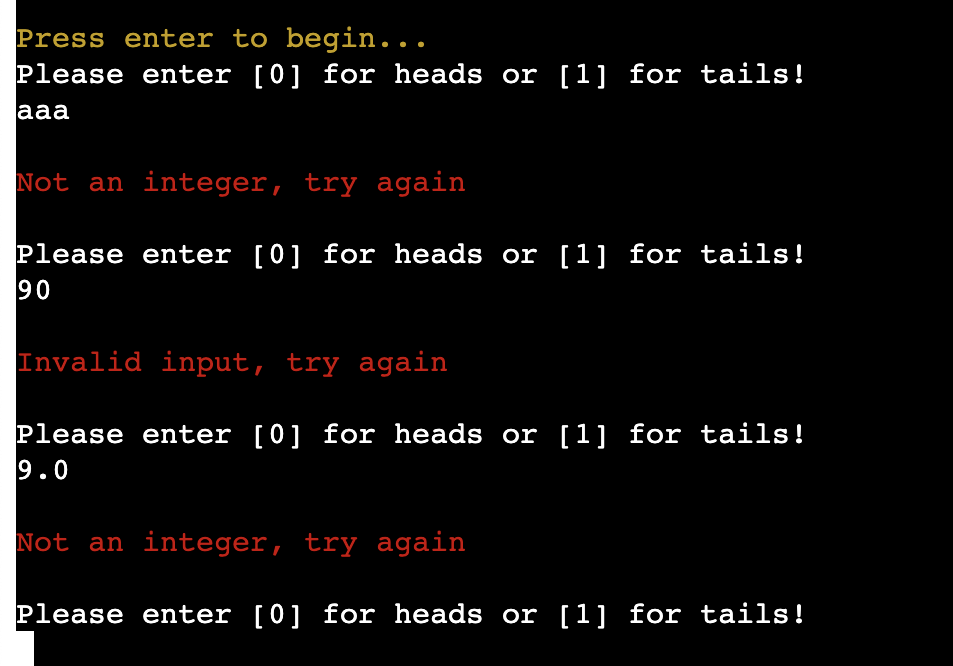
In game3 (Coin-Toss), these are the errors you will see by entering incorrect inputs where asked:
At the end of a round of Coin-Toss, if you input incorrect options, you’ll get messages like this:
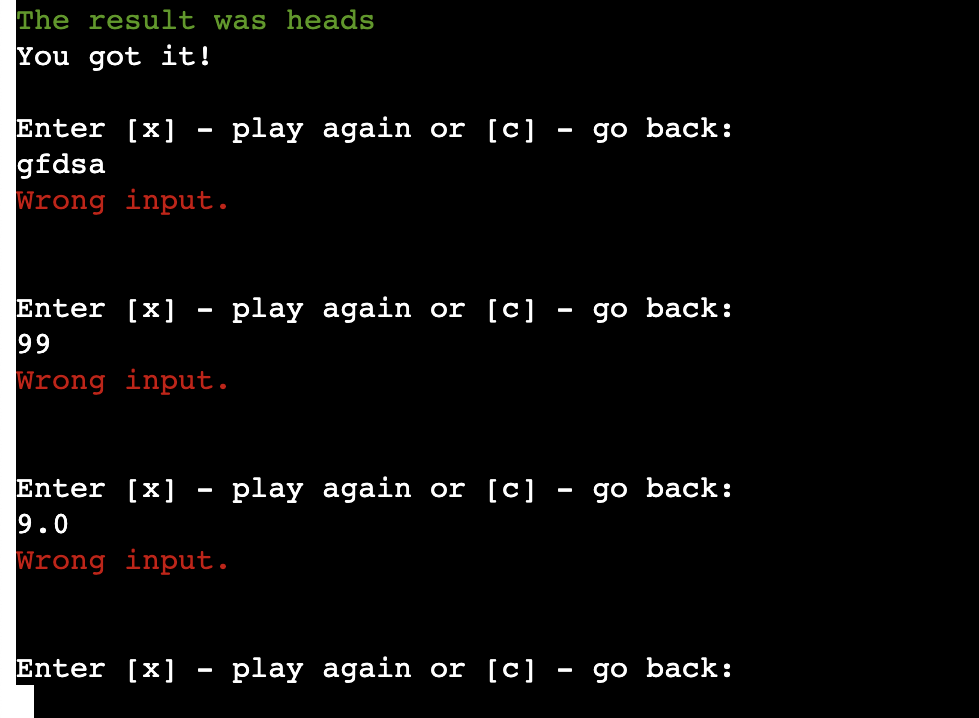
Specific errors for miss-use of Guess-The-Number (AI)
It might be obvious to you after looking at the second game that a player might lie about a number they’ve entered and either say it’s too high/low when it’s correct or press too low when the number is higher or vice versa.
There are some catches for this scenario, as I’ll demonstrate below:
If a player sees that the computer has correctly guessed the number, and lies, there is a fallback piece of code that will register this and print the following message:
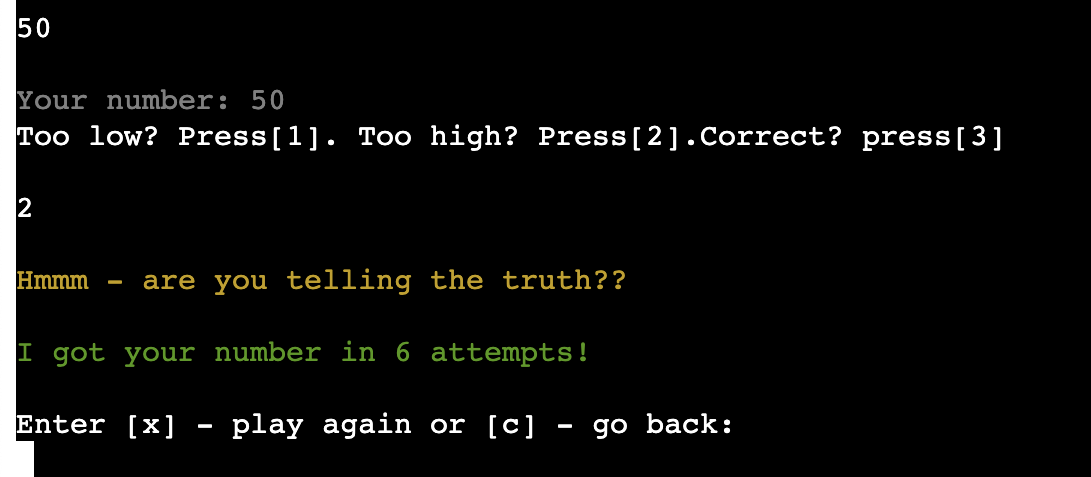
If a player intentially keeps lying about whether the number that the computer guesses is higher or lower, the computer will catch on eventually and print the following message:

Other Features to Implement
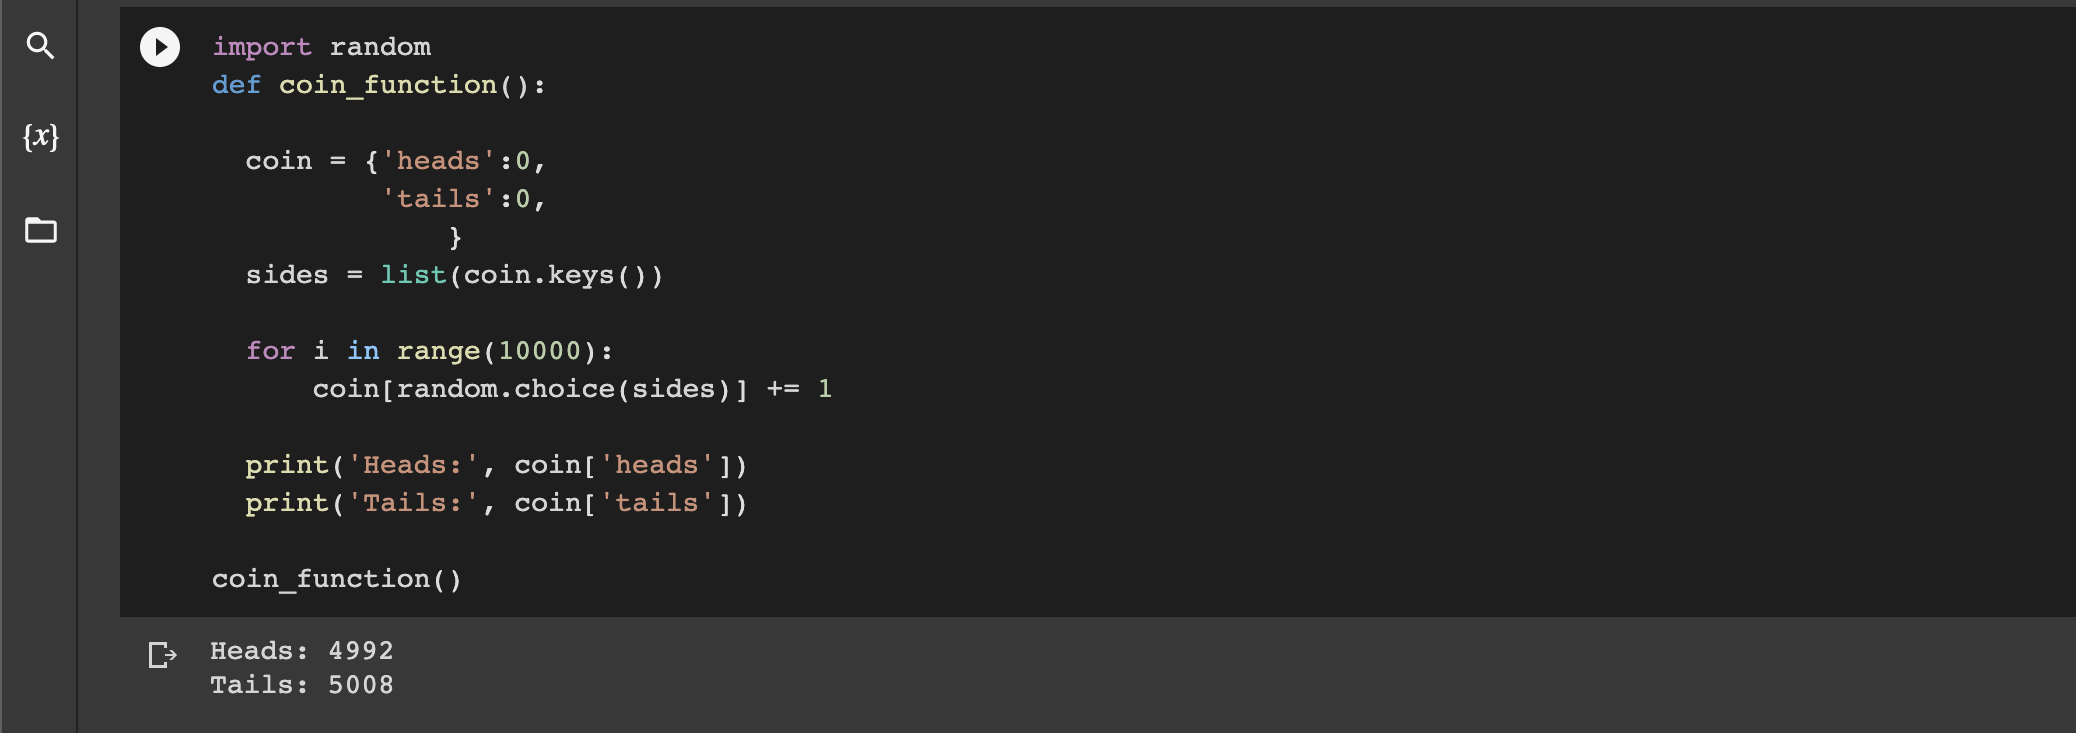
- On stack overflow, I saw a fantastic function that someone had written where they call how many times heads or tails is called out of 10,000 coin flips. I thought this was a fantastic idea and great bit of code that I would definitely want to have included in some way in the application in future. I did trial a similar version in Google collab but it didn’t make the final cut of the current version of the application:
-
I would certainly like to work with different API’s to see what further functionality/interactivity I could add to the application - I would try to make more random-event based games this way.
-
There are no scores or tallies in this game yet, which would also be one of the next features to add as this would add more of a goal to each game.
-
A player vs Player version of the Coin Toss with a best of 3 and 5 options being available. I’m sure a PvP version of Guess-The-Number (game1) could be created as well.
-
A small but interesting idea nonetheless would be to add the option to enter your name. This would be especially true if I implement a PvP (Player vs Player) option in future.
Testing and Validation
I ran my code through a PEP8 Validator and it passed with no issues/warnings:
PEP8 Validator
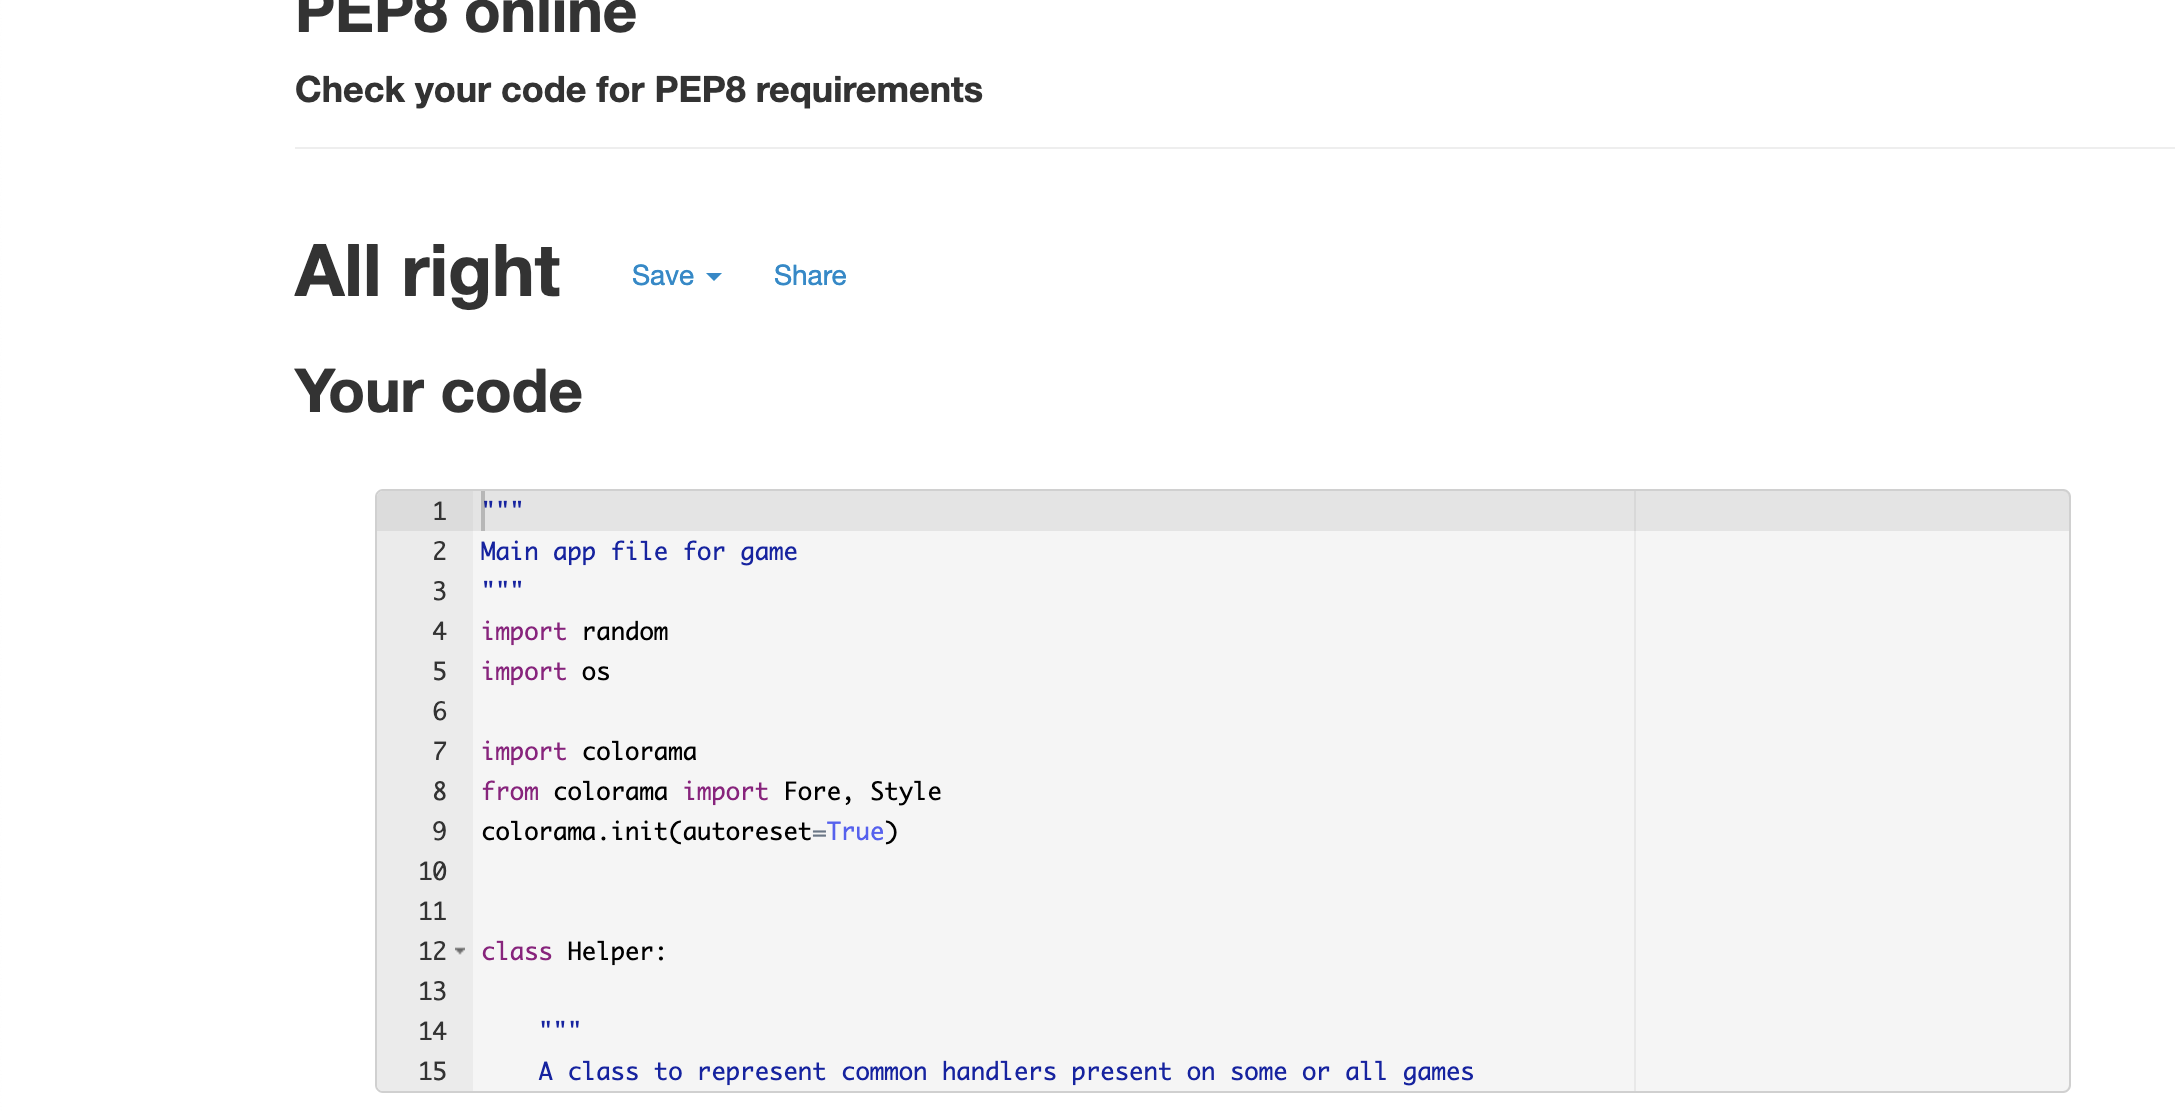
To test my application, I did my preliminary checks as I went along in the terminal in Gitpod using many print() statements in various sections of code. I did further testing in the browser on Mac through a deployed link through Heroku to make sure all output was working as expected. This did indeed lead me to make adjustments particularly in print statement spacing and the clear terminal function.
Any indentation or miss-types were also corrected as I went along, and individual or small pieces of code were usually tested in Google Collab first before being segmented in to the run.py file, particularly if I felt that what I was writing was stretching my comfort zone.
I checked to make sure the game ran in correct order by making first running small sections of the game followed by the whole game when it was near completion.
To test game1, game2 and game3:
- checked correct prompts appeared when expected
- checked spacing, colour and spelling were all as desired
- checked correct inputs appeared when expected and handled information with no errors. See below:
All inputs were tested in the gitpod terminal meticulously during the process of the application build. I would estimate several hours worth of testing on inputs alone to make sure they behaved as expected.
I checked for the following:
- Across all game inputs I asked the following:
- Can they handle incorrect inputs with an appropriate message reliably?
- Is a Try/Except statement to prevent errors?
- Should I handle this input through a dedicated function?
I am happy to say I am pleased that all inputs work well. The same rigorous testing would be applied to any future input options added to the application.
I have also run the program on mobile. Personally, I ran the game on iPhone 5, X and 12 with no obvious issues. Aside from aesthetics in the ‘terminal view port’ width and layout, I’m happy to say the project is running well across different media. As well as different media, I ran the project on 2 different browsers, Google Chrome and Firefox. Again, I am happy with performance across both.
Bugs and Issues
-
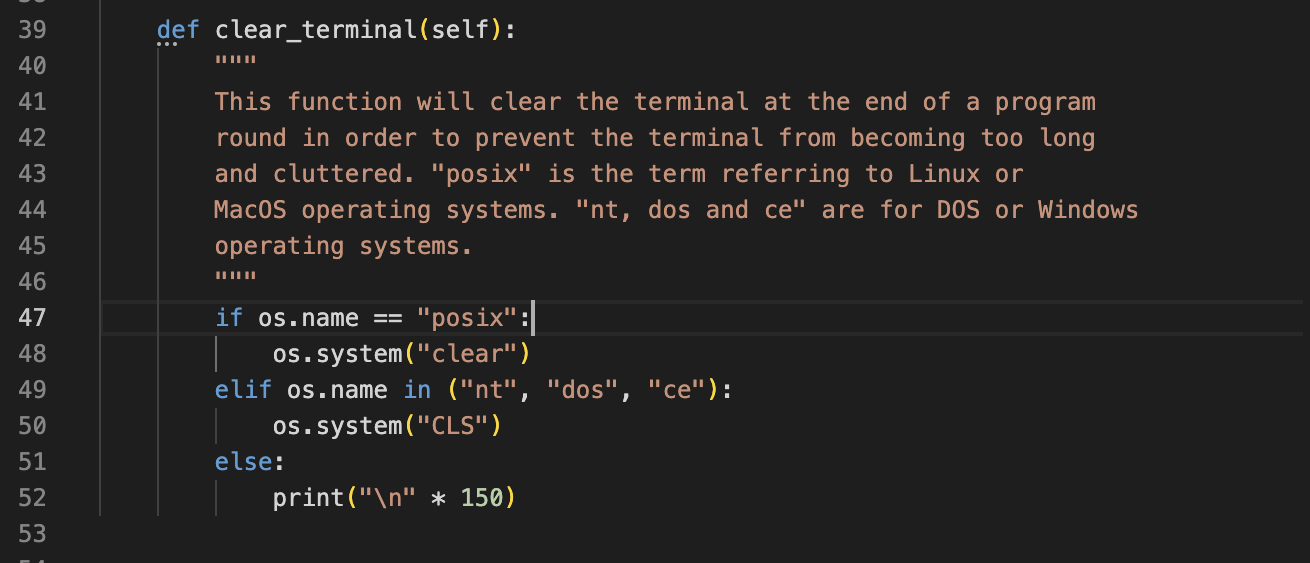
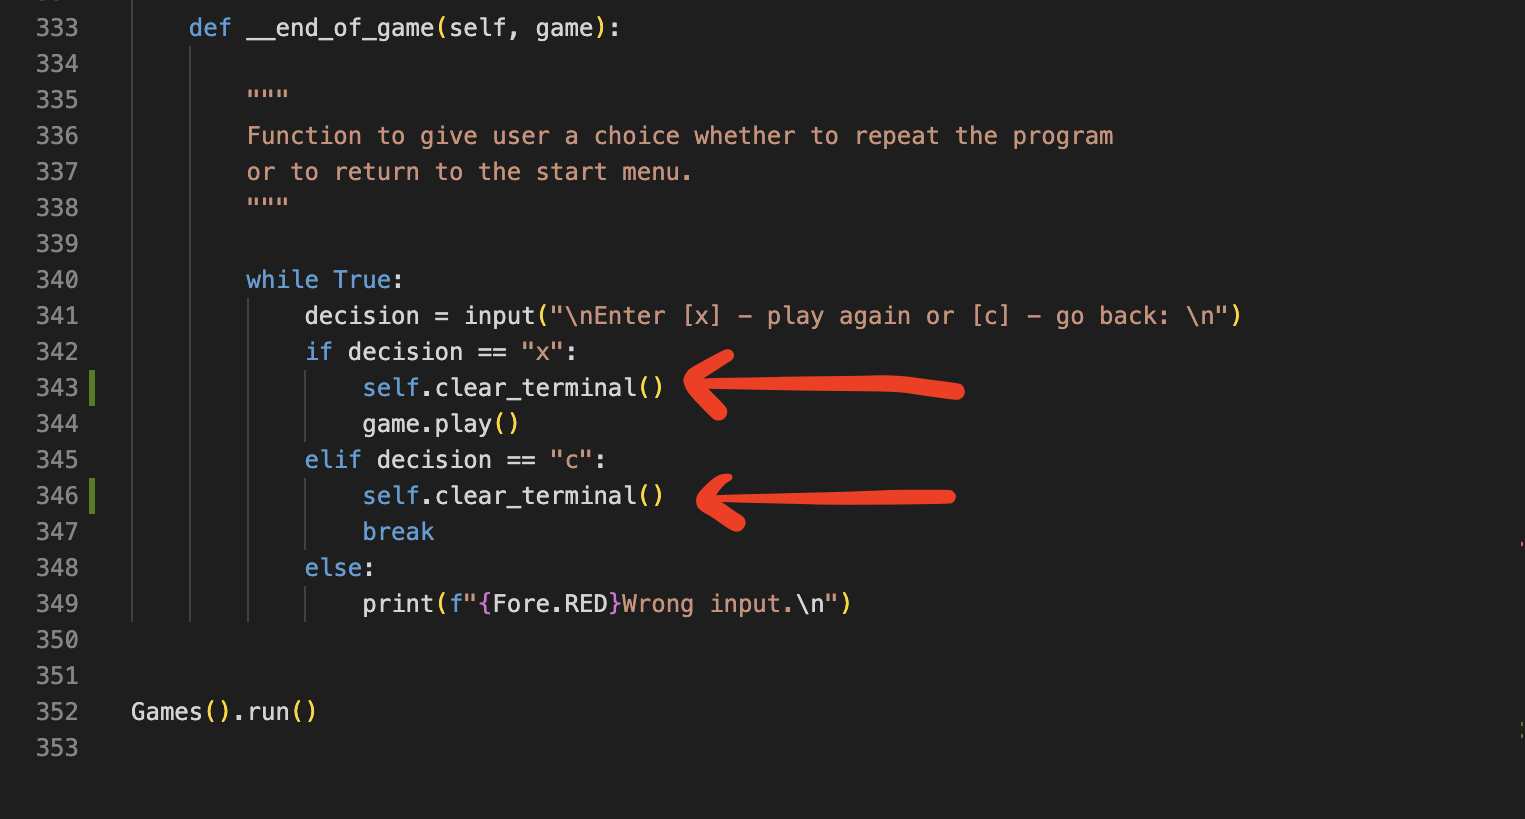
Terminal Clearing: I had an issue with getting my terminal clear function to work the way I expected it to. Orginally, I inserted the clear terminal at the end of each game, however, in restructuring my run.py file, I called the clear terminal function outside of the while loop in the run function in the class Games (line 299) and it seemed to work at first but wouldn’t work on the deployed game. I then called the clear terminal function into the end of game function as well and that seemed to solve the issue by pushing the terminal up to the top of the view port. It’s not perfect, but it works.
-
Converting back to key name from value: this was a real challenge. It was only through a source on stack overflow and some help from my friend Nickolay that we worked out how to convert values back into key-names taken from a dictionary. This solution was utilised in Game 3 (Coin Toss).


-
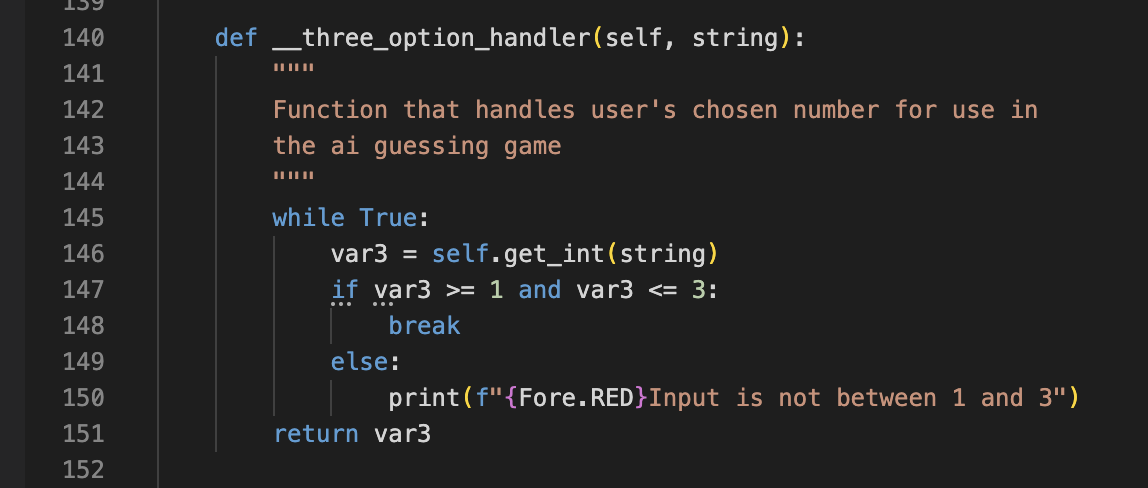
Guessing game ai input handling issues: In the second game (Guess-The-Number (AI)), I had an issue where where you could input any integer you wanted when the “Press 1 for too low, 2 for too high or 3 for correct” Promt came up, as I used my get_int function which took any integers and returned them. I found that the way around this would be to create a function to handle this specific request - I called it three_option_handler and it only returned if the response was either 1, 2 or 3. This resolved the issue perfectly.
-
Printing a list of past guesses: Originally, I kept getting either an empty list printing to the terminal or having it display as “None”. The solution was to move the empty list above the while loop in the first game (Line 77)as it seems that the list kept resetting as the game was running.
-
An interesting one spotted by Niki Tester on Slack was that my attempts numbers were always out by 1. To fix this, I added “ +1” to the final f string print messages at the end of the guess-the number games (game1 and game2) and that solved the issue.
-
There was an issue where if the player didn’t play the game as intended and lied about the results in game2 (Guess-The-Number (AI)), it would throw a traceback error in the terminal. An extra try/except statement was included and another if statement and it catches out the problem. This issue in particular was spotted by Niki Tester and together we found a solution to the problem.
-
On the deployed game, I had a flickering issue when a number greater than 3 or less than zero was entered in the main menu. To fix this, I imported Python’s time module and set a time.sleep for 3 seconds in the menu run function. This did fix the flickering but I still wasn’t too happy as during the 3 second delay you could continue to input different options. It was only after this I realised I was calling my clear terminal function too early and this was causing the flickering. By removing this, it did an even better job than introducing the time module and so I promptly removed it.
Peer Reviews
To get some peer reviews for this project, I went to the following:
I had my friend Nickolay, who is fantastic with Back-end languages, review my code and during the project he has pushed me to do better any time I’ve asked him to review my code. He’s helped me solve issues/bugs his great understanding of Python.
I submitted my project to the peer-code-review channel in the C.I Slack community and received the following feedback:
-
Niki Tester on Slack suggested I add in a feature to remind the user what their chosen number was in game two. I reassigned the orginal user_response in to two variables: user_response and user_number. It now shows above every prompt as a dimmed print statement. This was a great idea and addition to the app so many thanks to Niki!
-
A few other users on Slack also made some suggestions regarding how I could present the list of past guesses differently and also I had a suggestion for future builds to automate the whole second game and remove the user input element of it.
-
Dave on Slack found a flickering bug in the main menu if an incorrect integer greater than 3 or less than 0 was entered. I took this feedback and imported the python time module to introduce a small pause to stop the flickering issue. It was only after this I realised I was calling my clear terminal function too early and this was causing the flickering. By removing this, it did an even better job than introducing the time module and so I promptly removed it.
-
Daisy, my C.I Mentor, has been reviewing my work at the beginning, middle and end of my project, providing vital feedback in the direction and scope of my project. In the final review right the end of the project, Daisy was very happy with how far I’d come with the project, and after a couple of further suggestions for my code and README file, I was ready to submit it.
Deployment
Follow the steps below to see how to deploy a repository through Heroku:
Build an app in Heroku:
To build an app in Heroku, follow these steps:
-
Open the Heroku site, login and access your dashboard. In the top right hand corner of the website, click on the “New” button and select “create new app”.

-
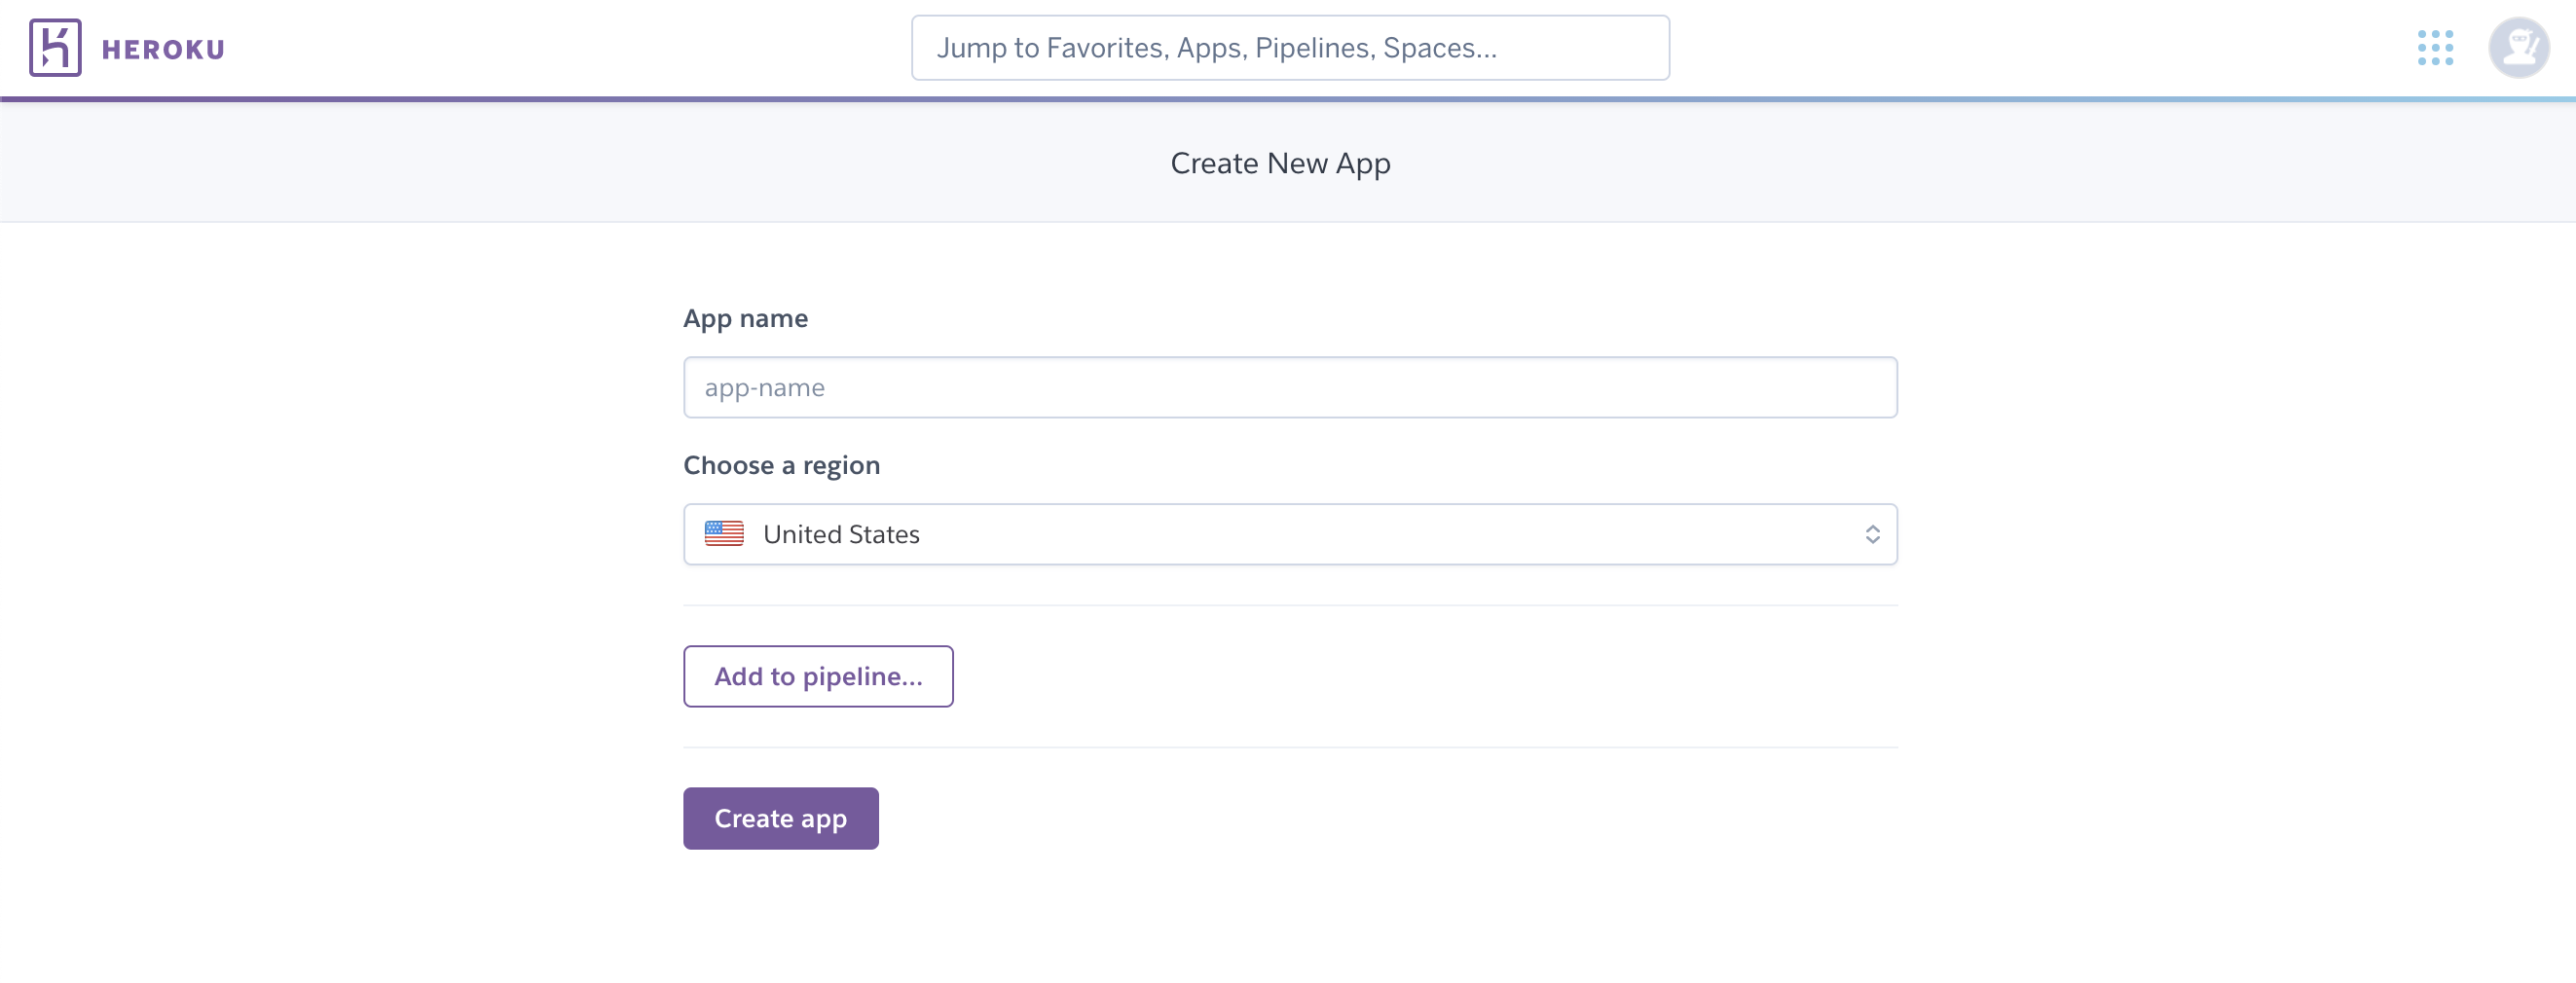
You will be brought to a new page where you can enter the name of your app and the region you are based in. Once you do this, click on the “create app” button:
-
Once you do this, you will be brought to the app-specific dashboard.
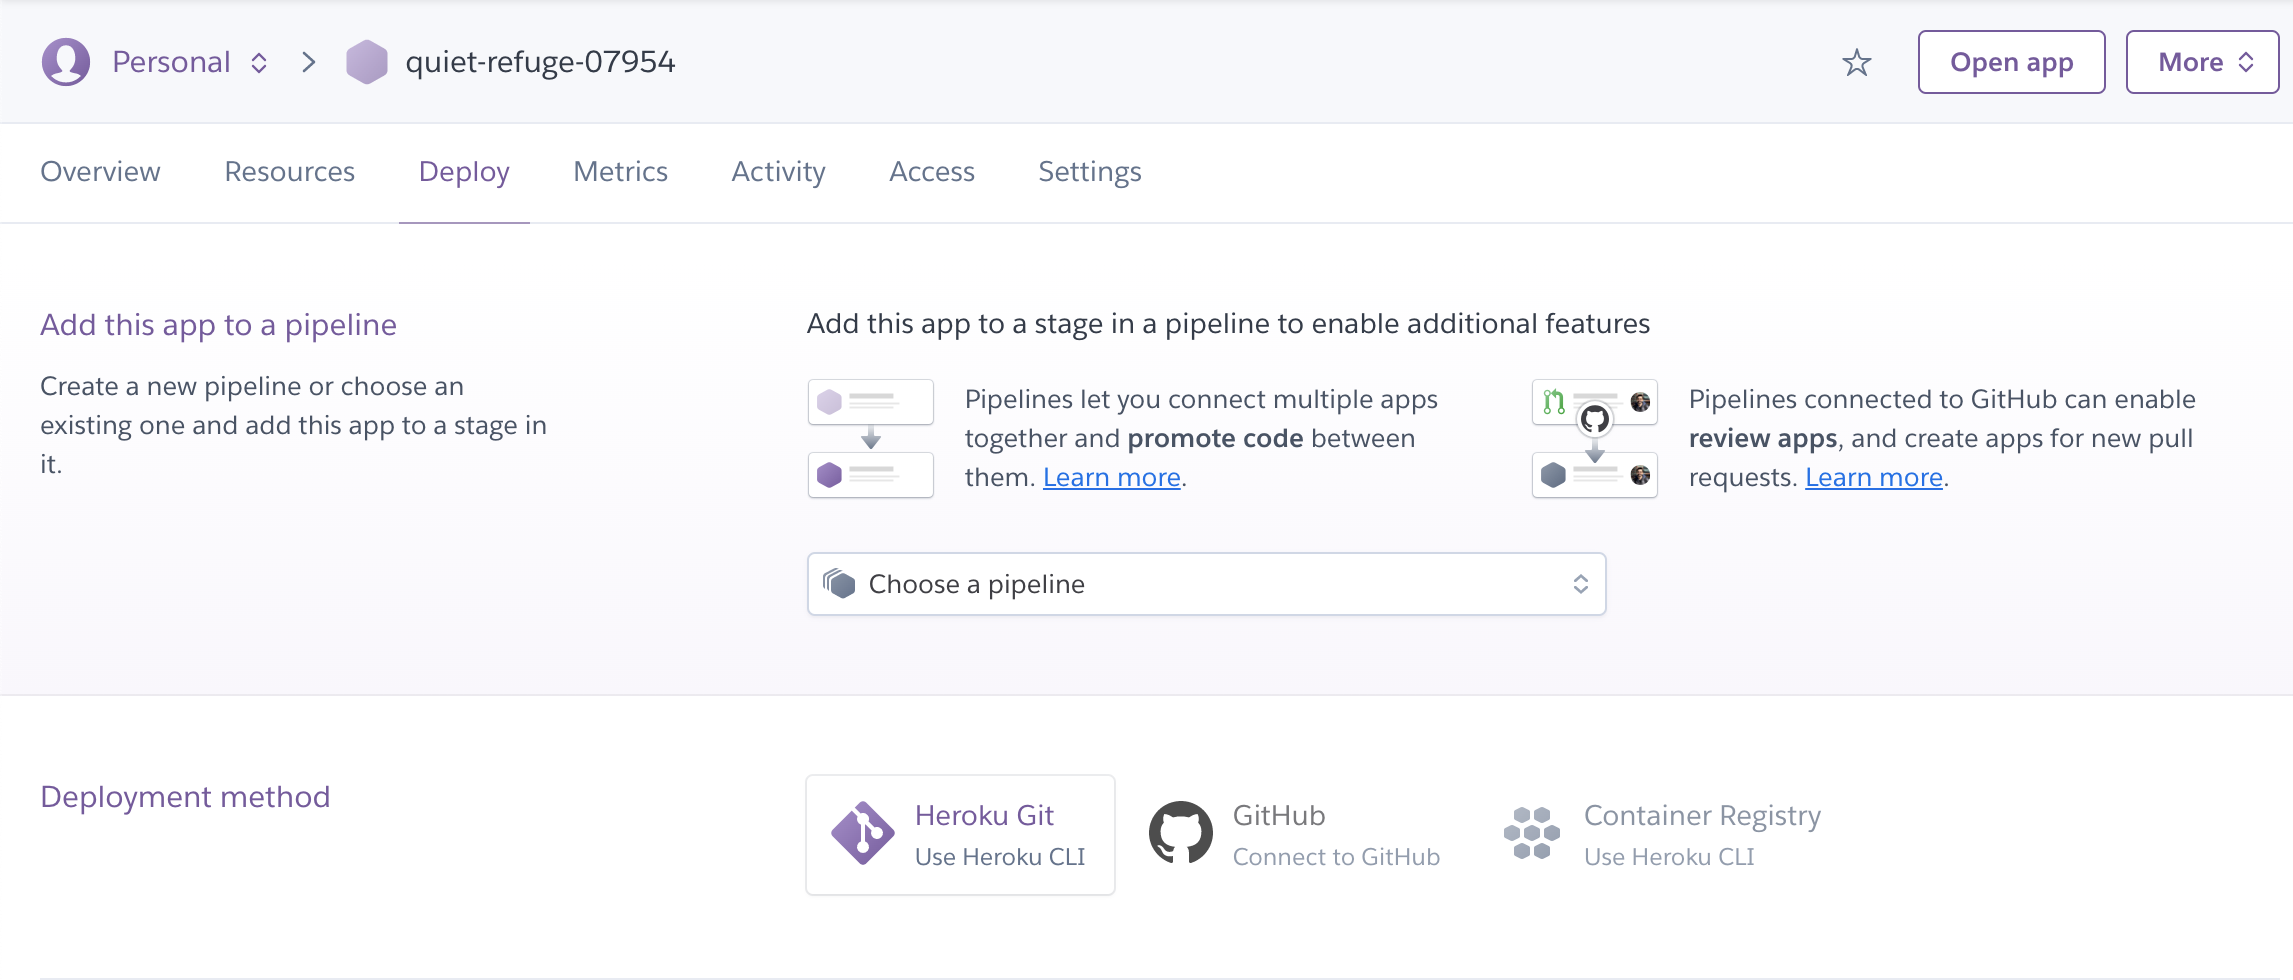
- Make sure you connect/link your github account for ease of deployment and then head to the settings tab to configure vars and install required buildpacks:
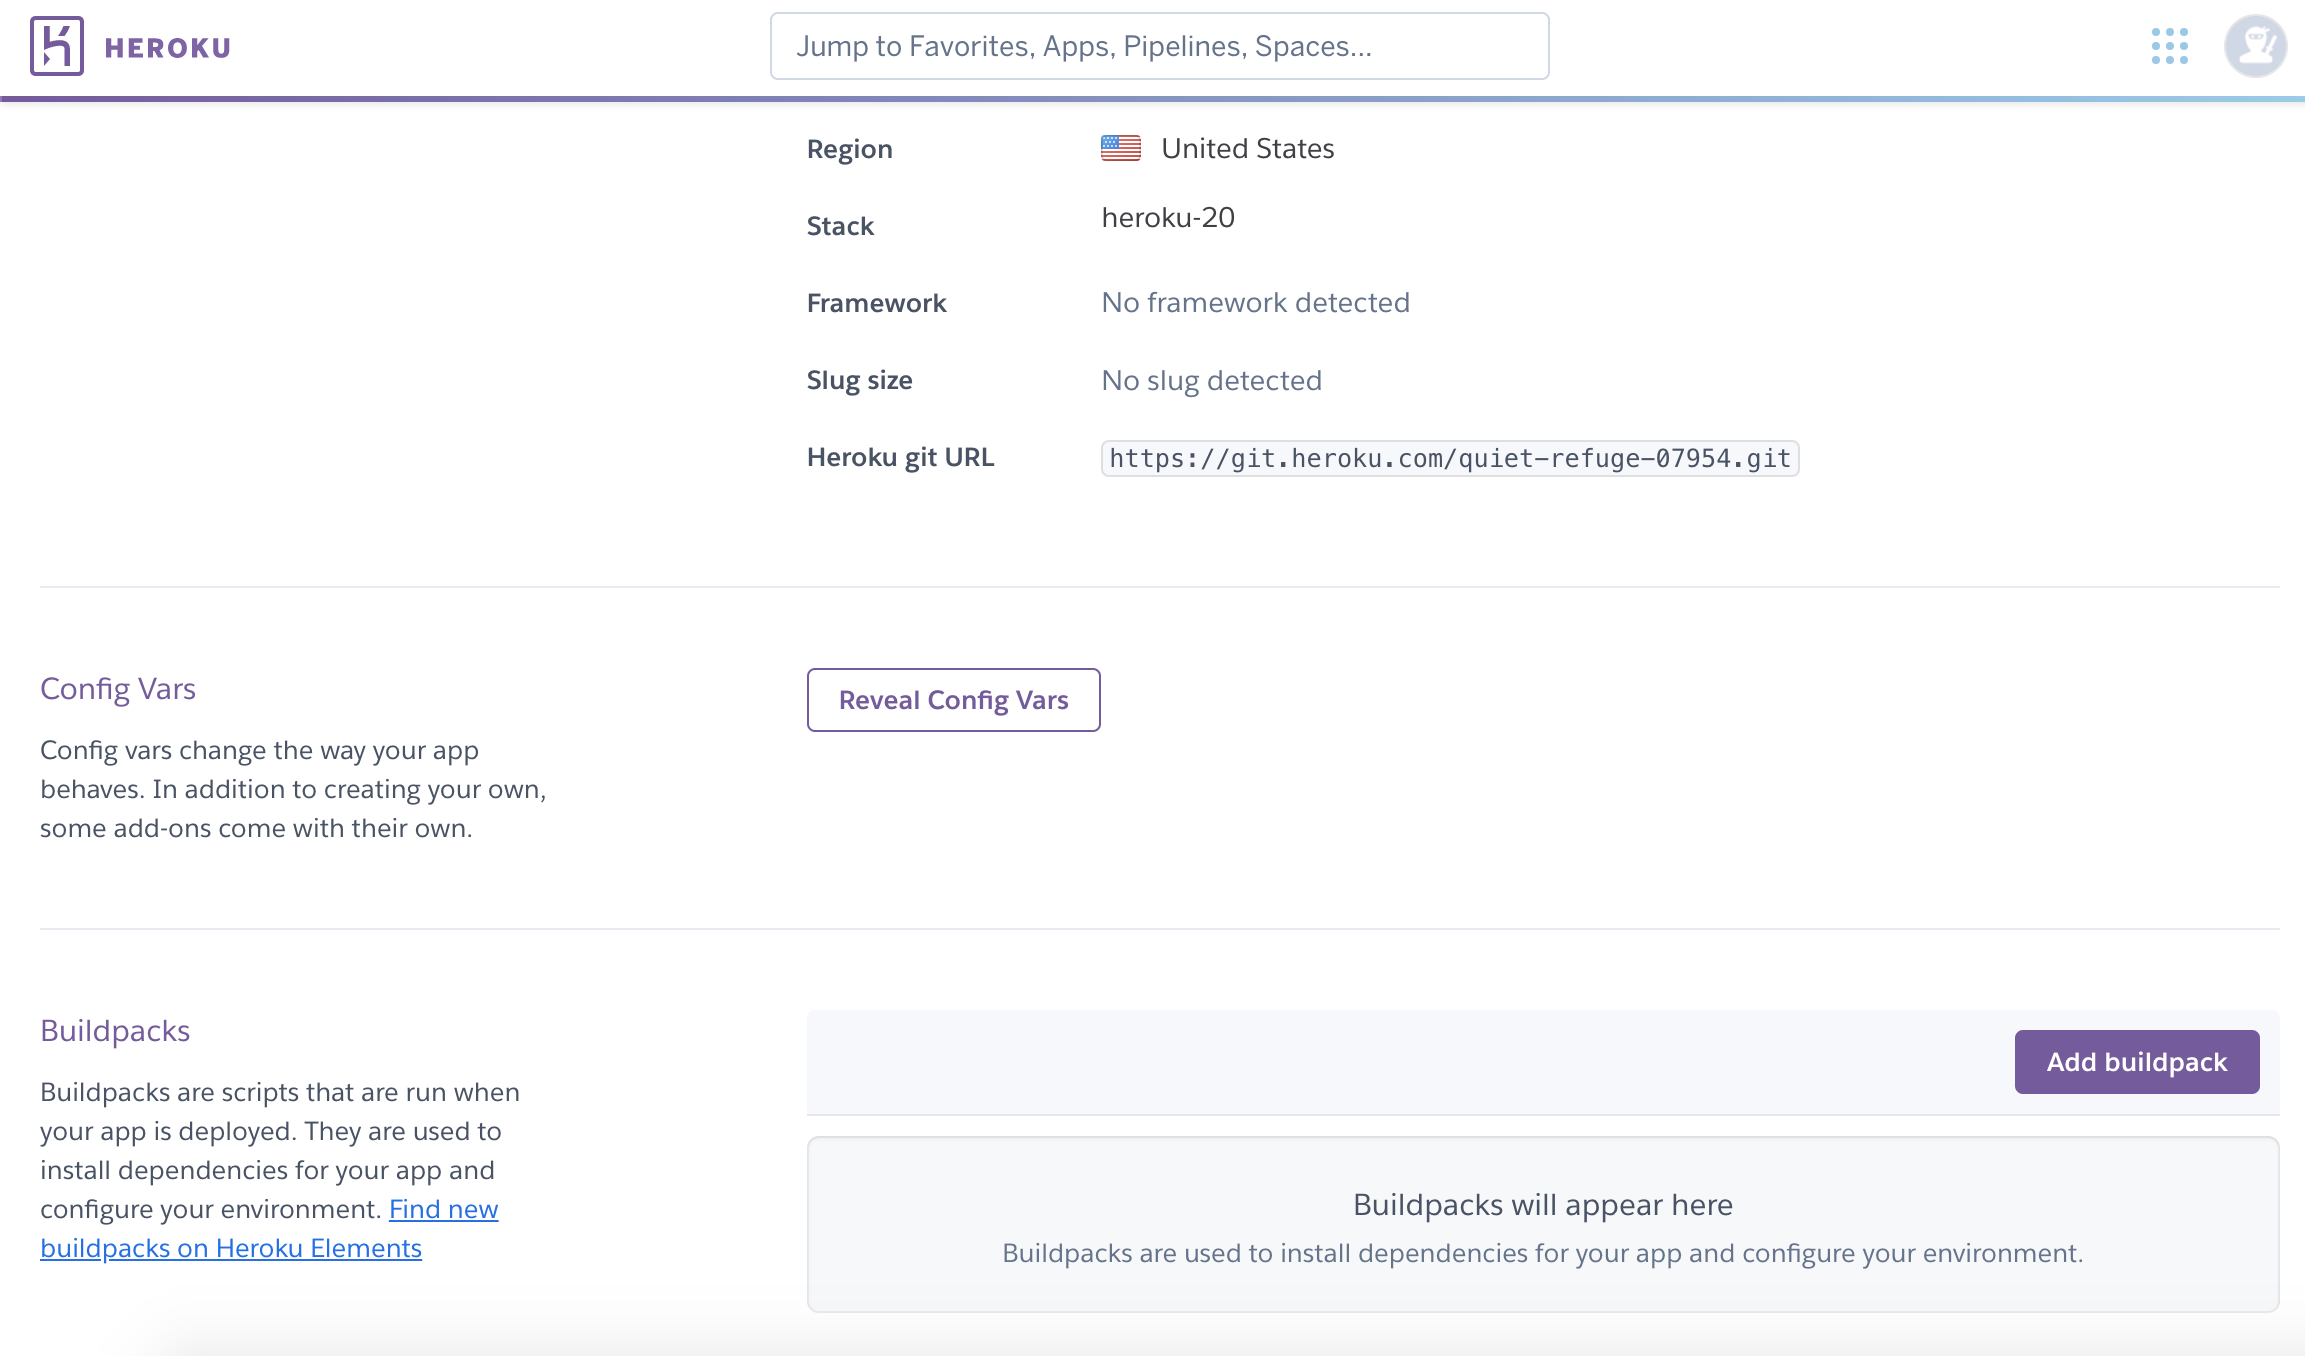
- You will want your config vars to have the key and value –> PORT and 8000
- Buildpacks required will be Python and Node.JS in that order
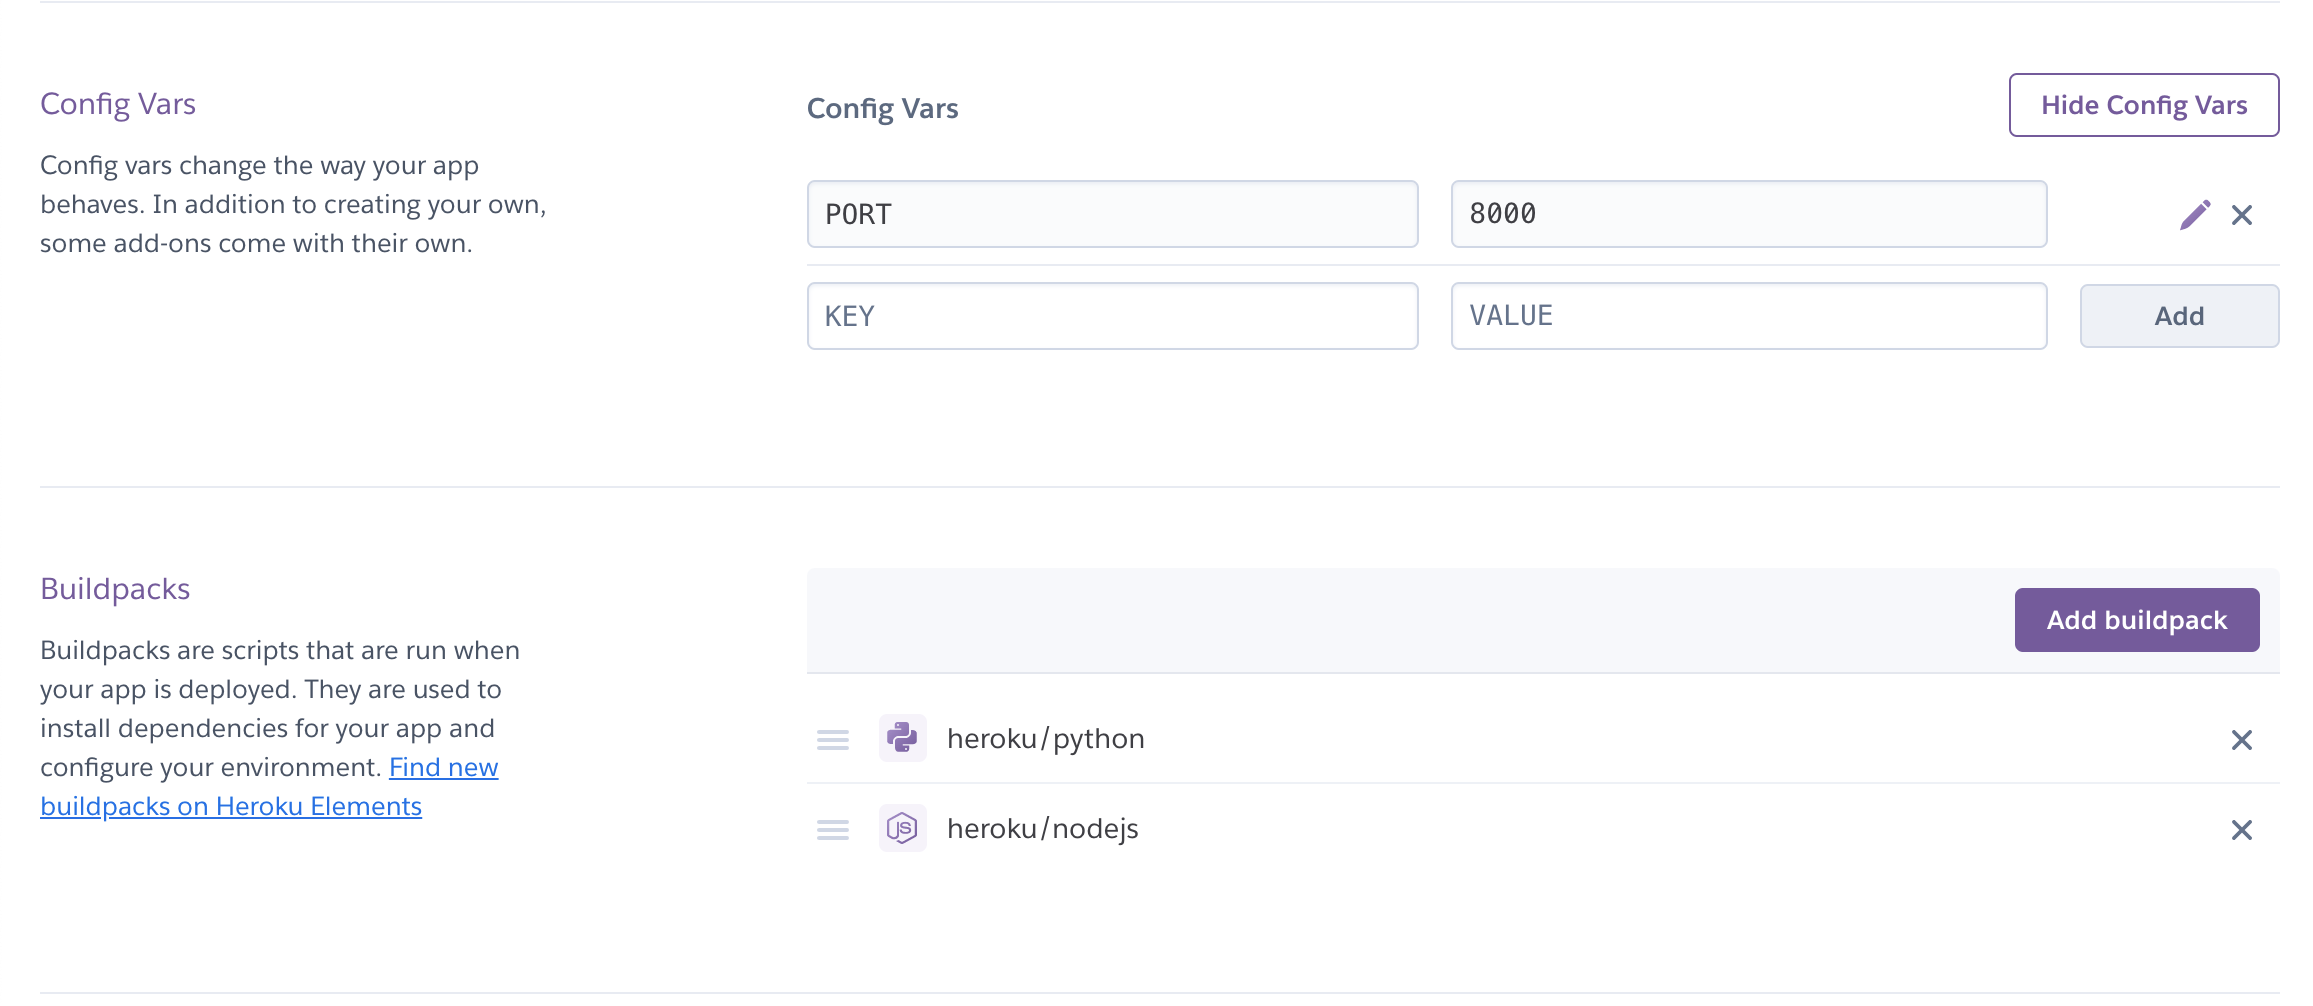
- Once this is done, you are ready to begin deploying your application!
Steps to deploy your app to Heroku:
- Login to Heroku in the terminal by entering the command heroku login -i followed by your login details.
- Retrieve your application’s name from heroku and enter heroku apps.
- Set the heroku remote: (make sure you replace the
with your actual application name) heroku git:remote -a - Next, as per a usual deployment to github, enter the following commands with a similar message: git add. (followed by –>) git commit -m “Deploy to Heroku through CLI” (followed by –>) git push origin main (followed by –>) git push heroku main
Alternatively, if available, you can also enable auto or manual deployments if you link your github account and repository to your Heroku account. This enables much faster linked deployments without using the CLI.
Credits
I sought inspiration from many different websites/sources for this project. With many thanks to the following:
- An example guessing game by PythonForBeginners: PythonForBeginners Link_1
- An example coin-toss game that returns the result of 10,000 coin tosses: PythonForBeginners Link_2
- Lessons on a 2 guessing games inspired this project from freeCodeCamp.org: freeCodeCamp
- Superb information on handling user inputs: TowardsDataScience
- “Key by Value” solution for my coin toss game inspired by this answer on Stack Overflow: Stack Overflow Link_1
- Solution for finding a way to clear the terminal as a function from Stack Overflow: Stack Overflow Link_2
- Colorama Youtube tutorial by Tech with Tim: Tech With Tim
- Link to Colorama page/tutorial: Colorama
- Responsiveness Check: Am I Responsive?
- Flow Chart maker: LucidChart
- Stephen Darcy on the C.I Slack channel #lets-deploy-it has a great set of instructions on deploying to Heroku which I have found to be particularly useful as at the time of making this project Heroku was hacked and had to take down auto and manual deployment through linked github accounts.
- To covert videos to gifs I went to EZGIF: EZGIF.COM
I couldn’t have done this project without the help of some key individuals:
- Daisy McGirr - My Code Institute mentor. Helped guide my along the course with advice on scope and assesment criteria, as well as ideas for the project.
- Nickolay Ninov - A massive thanks to Nickolay for providing so much help and support over the course of the project. He helped me resolve bugs and issues that I’d have been stuck on without his help!
- London C.I Community - Providing encouragement and feedback for my project which is always welcome. They continue to support as per my previous projects and are a great group to be a part of!